Yes folks I am walking on sunshine from the AWESOME news at Ryan's appointment today.
But right now I feel like someone punched me in the gut after celebrating at Panera Bread!
Much more in the days ahead.
I am feeling especially happy for my son and grateful my motherly instincts were correct.
And of course Praising God from whom all blessing flow!
That's all for now.......I am off to eat some Tums.
Wednesday, August 31, 2011


Tuesday, August 30, 2011
Still here...
I am still here folks! Just taking more breaks and slowing down. And to be honest just a little preoccupied. I have sat down so many times since last Thursday to write up a post and there is nothing there. I even took my cute school background down because I was bored with it and wanted a change. Still looking for a new one................
I have been doing lots of home projects.....painting and decorating.
And then my parents were here over the weekend. So I devoted that time to visiting with them. Then yesterday was a day to catch up on "stuff".
School is getting so close too! I have just about everything we need. Just a last minute shopping trip for a few supplies. And then planning our special 1st day.
I want to do so much, but I am waiting to get through tomorrow.
Ryan will go for a check-up and xray for his Infantile Scoliosis. This is a very important check-up since we took him out of the brace back in May.
Are we anxious? I AM!!!!
Do I want to go through this again? NO!!!
Will I freak out if he has to go back into that dang brace? YES!!!!!
Will I be a big girl and not let him see me cry? YES!!!
Does he know there is a chance he might have to go back in the brace? YES!!!
Is he OK with it? As OK as a 6 year old who HATES his brace can be!
Does he still wonder why God made him this way? Of course!
I had a Mom who also has a son with Progressive Infantile Scoliosis, ask me the other night on FB if it ever gets any easier going to an appt. Her son was going the next day for a check-up after being out of the brace for a while. I could not lie....I told her NO! It does not get any easier.
You still have that sick feeling deep down in your gut before the appointment, during the xray and waiting on the doctor to come in to tell you the results. You try not to get excited one way or the other. And when he tells you the results you either feel like you are walking on sunshine or someone just PUNCHED you in the gut!!!!!
I never go to an appointment with high expectations. I guess you could say I go feeling cautiously optimistic. And I am going to do the same tomorrow. His appointment is not until 2:30 so please no phone calls. With the appointment being that late, drive time back home and supper being very near, I will mentally be exhausted! I'll update ASAP.
I will need that time to let it all sink in anyway......good or bad.
I promise to update my blog even if it is a one liner.
So you see I am still here just have lots on my mind right now.
Thursday, August 25, 2011
Coat Rack Redo
I am slowly checking items off my project list. I can see several will be carried over into Fall, but that is OK. Once we are settled with a routine with school I'll have extra time to play.
This is a coat rack I found last year at Goodwill for $6. It is in great condition and the color was not too bad either.


We actually had it hanging last Fall, but as usually I wanted a change. Since we are painting all our walls a brighter color I thought the coat rack needed a change too.
So I got after it. I started out by watering down white paint. We already had the white paint so it costs me nothing.

It was not the look I was hoping for. Check it out.
 Too cloudy looking. I think I added too much water. But hey that is OK, I had a dark stain!


I used a paint brush to apply the stain and right after the whole rack was painted I used old rags to wipe it off. And here is the $6 Goodwill coat rack(these pictures do not do it justice!)
I LOVE the marble effect I somehow came up with. And how you can see little bits of white and the dark green coming through.
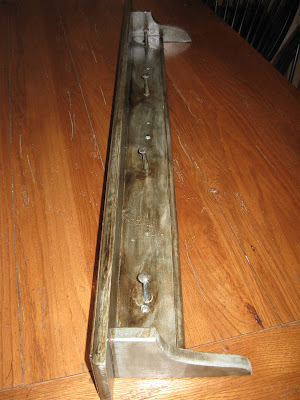

I am a nut for acheap frugal redo. $6 is all it cost me!!!

Just FYI this took a good four days to dry. I think maybe because it is SO hot here and no breeze whatsoever.
When I redo a piece I just kinda go for it and with it. If a color does not work like I was thinking.....I try something else. And I try to use whatever we have on hand.
I love the new look! And it will pop on the new brighter color we are painting all the walls.
Can't wait to hang it!!!
This is a coat rack I found last year at Goodwill for $6. It is in great condition and the color was not too bad either.


We actually had it hanging last Fall, but as usually I wanted a change. Since we are painting all our walls a brighter color I thought the coat rack needed a change too.
So I got after it. I started out by watering down white paint. We already had the white paint so it costs me nothing.

It was not the look I was hoping for. Check it out.


Again we had this in the garage so I am still at $6 bucks!

I LOVE the marble effect I somehow came up with. And how you can see little bits of white and the dark green coming through.

This is the top that no one will see, but I wanted show it so you could see the way all these colors mixed.

I am a nut for a

Just FYI this took a good four days to dry. I think maybe because it is SO hot here and no breeze whatsoever.
When I redo a piece I just kinda go for it and with it. If a color does not work like I was thinking.....I try something else. And I try to use whatever we have on hand.
I love the new look! And it will pop on the new brighter color we are painting all the walls.
Can't wait to hang it!!!
Wednesday, August 24, 2011
It's just paint!
Have you ever had a vision of something you really wanted to do.....like a craft project, decorating project, furniture or say a color to paint a wall?
We have been busy painting since Sunday night. Four rooms, one l o n g hallway and a short hallway. We still have two rooms to go and the shorter hallway.
We went from a dark mustard color to a bright beige. Bonjour Beige and I! LOVE! IT!!
And of course I had this vision that I now know should have stayed in my head. But instead we went for it. I wanted that accent wall!
Tahoe Blue................doesn't it just sound peaceful and lovely?!
Let's just say it was not what I was thinking. And Brant was not crazy about it either.
In just 24 hrs you will see the changes the accent wall went through.
It started out like this...............................
And then we tried this.......................
This was not a summer project that I had intended on. But when your house is turned upside down due to major plumbing and foundation issues you get a little crazy! BTW you may have noticed that rug looking thing at the bottom right of the picture. Next to the bar stool.....that is a piece of wood or "something" with lovely black Duck tape covering the hole. It will be like that until Brant slows down for the Fall and has time to repair. It's there and I am perfectly happy with it.
Anyway I love the toned down color going on in our home these days. It went from dark Autumn like colors to one color. One much brighter, warm color.
Painting is FUN and a fairly cheap way to redo/add new life to your home. Even if you do have a vision that does not play out well.
Hey it's just paint!
We have been busy painting since Sunday night. Four rooms, one l o n g hallway and a short hallway. We still have two rooms to go and the shorter hallway.
We went from a dark mustard color to a bright beige. Bonjour Beige and I! LOVE! IT!!
And of course I had this vision that I now know should have stayed in my head. But instead we went for it. I wanted that accent wall!
Tahoe Blue................doesn't it just sound peaceful and lovely?!
Let's just say it was not what I was thinking. And Brant was not crazy about it either.
In just 24 hrs you will see the changes the accent wall went through.
It started out like this...............................
 |
| Dark brick red.....I did love it for years! |
And then we tried this.......................
 |
| Tahoe Blue Vision |
 |
| DONE! LOVE! |
This was not a summer project that I had intended on. But when your house is turned upside down due to major plumbing and foundation issues you get a little crazy! BTW you may have noticed that rug looking thing at the bottom right of the picture. Next to the bar stool.....that is a piece of wood or "something" with lovely black Duck tape covering the hole. It will be like that until Brant slows down for the Fall and has time to repair. It's there and I am perfectly happy with it.
Anyway I love the toned down color going on in our home these days. It went from dark Autumn like colors to one color. One much brighter, warm color.
Painting is FUN and a fairly cheap way to redo/add new life to your home. Even if you do have a vision that does not play out well.
Hey it's just paint!
Monday, August 22, 2011
From the archives-Loaded Oatmeal Cookies(School Snacks)
With school right around the corner it has me thinking of snacks to have ready for the boys. Snacks that are good for them, but a treat.
I posted this recipe last year around this time so I thought I would share it again for any new readers. These are so good and freeze really well. I wrap 4-6 cookies in freezer paper, put them in a baggie and place in the freezer. When I know these will be a snack I will take a baggie or two out to thaw.
These are the perfect mid-morning snack, addition to lunch or afternoon snack!
Loaded Oatmeal Cookies
Makes about 24 cookies, but I doubled the recipe.
4 tablespoons(1/2 stick)unsalted butter, softened
1/4 cup vegetable shortening, softened
3/4 cup packed brown sugar
1 egg
1 teaspoon vanilla
2/3 cup flour
1 teaspoon baking powder
1/2 teaspoon salt
1 1/2 cups quick-cooking oats
1/3 cup chocolate chips
1/2 cup raisins
1/2 cup chopped pecans(optional)
Preheat oven to 350. Grease two large baking sheets.
Cream the butter, shortening, and sugar until pale and fluffy. Beat in the egg, then the vanilla. In a large bowl, sift together the flour, baking powder, salt and oats. Fold into the butter mixture. Stir in the chocolate chips, raisins, and pecans.
Drop heaping teaspoons of the mixture onto the baking sheets-I did a dozen per cookie sheet. Bake for 12-15 minutes until lightly brown around the edges. Allow to cool for 5 minutes and then transfer to a wire rack to cool completely.
What type of homemade snacks do you keep on hand during the school year. I would love for you to share......I am always looking for new recipes for snacks!
Friday, August 19, 2011
School is near!!!
Like my new background? I am getting ready for school and am getting in the mood. When that happens I always love to change my backgrounds to fit my mood and the current season.
I finally set a date for us to begin our 2nd year of homeschooling! The boys will be in FIRST grade!!!
We will begin September 12th.
I know it is late, but that is the joy of homeschooling people!
Even starting that late we will still be done by May 25th. And that is includes taking some time off during the holidays. Plus we will still have time for make-up days if needed.
So the next couple of weeks will include lots of stuff about SCHOOL as well as one(maybe two)last minute summer projects I am working on.
I can't wait to go shopping for school supplies, get school snacks made and in the freezer and get a firm schedule set in place. I get so excited the closer it gets.
Oh and I can't wait for that 1st day!!! And to take those "1st day of school" pictures like last year.
Speaking of.......here are the 1st day pictures for Kindergarten.

 Awww, they have grown up since then!! They look so different!
Anyway I am already planning that special first day!! That is always fun because it is a total surprise to the boys.
I am anxious to get started and see how our second year goes!!! And really anxious to have a routine!
School is near!!!!!!
I finally set a date for us to begin our 2nd year of homeschooling! The boys will be in FIRST grade!!!
We will begin September 12th.
I know it is late, but that is the joy of homeschooling people!
Even starting that late we will still be done by May 25th. And that is includes taking some time off during the holidays. Plus we will still have time for make-up days if needed.
So the next couple of weeks will include lots of stuff about SCHOOL as well as one(maybe two)last minute summer projects I am working on.
I can't wait to go shopping for school supplies, get school snacks made and in the freezer and get a firm schedule set in place. I get so excited the closer it gets.
Oh and I can't wait for that 1st day!!! And to take those "1st day of school" pictures like last year.
Speaking of.......here are the 1st day pictures for Kindergarten.


Anyway I am already planning that special first day!! That is always fun because it is a total surprise to the boys.
I am anxious to get started and see how our second year goes!!! And really anxious to have a routine!
School is near!!!!!!
Thursday, August 18, 2011
Clean Blessings
When it comes to cleaning our home I am not a natural. NOT at all!!!
In fact I am allergic to many cleaners and they literally make me ill. The smells are so strong from all the chemicals in them I immediately get a headache Headaches turn into migraines which leads to me trying to sleep them off. And leading to me putting off the cleaning.
However, I know that if I am to care for my home, and more importantly my family, I need to clean!
I do enjoy creating a clean, peaceful home environment (not a perfect one!). I just don't particular care for how I have to go about it.
So I decided to make my own cleaner!! I knew the bottle would have to be cute and fun, but I also knew the cleaner would have to smell good!
I know what you are saying, "WOW, you sure went to a lot of work for a cleaning bottle!"(Brant said the same exact thing!!!)
Yes, as a matter of a fact I sure did! I don't like cleaning! So I thought maybe if I spent a little extra time making it cute and fun, that cute and fun would rub off on me in the cleaning department.
-Verdict still out-
I wipe down the kitchen counter so often this is cute enough to stay out for all to see.
Moving on to what I used......................Vinegar is great for cleaning, but the smell is not the greatest. My nose can handle citrus smells so I decided to add some citrus scents to my all purpose cleaner.
I used essential oils. Essential oils are ideal for adding to your cleaning supplies. They remove toxic mold, stale air, unpleasant odors, and kill viruses, bacteria and dust mites. Use essential oils that please your senses and at the same time deep clean you home.
I decided I would use two citrus scents. Lemon and Tangerine. Oh so yummy!!!
These are 100% pure essential oils. I like the Aura Cacia brand only because it is the only brand I have ever tried.


So I then had a recipe for Clean Blessings!
The name: blessing my family and home as I clean with natural products.
So here is the recipe and what you will need for Clean Blessings.
-distilled white vinegar
-essential oils(optional)
-a few drops of dish soap
-water
-a spray bottle
In a spray bottle add mainly vinegar with about a cup of water. Add 20-30 drops of each essential oil and a few drops of any dish soap. Shake well and CLEAN!!!!
That's it!
As far as the bottle I used chalkboard scrapbook paper and craft glue dots to stick it on. I bought the ribbon to match the bottle. I cut it to make a border around the "chalkboard". And then I had to add a cute bow!
And that folks is my attempt at making cleaning more FUN! Along with keeping my headaches away.
Do you make homemade cleaners? What do you use? I would love for you to share.
In fact I am allergic to many cleaners and they literally make me ill. The smells are so strong from all the chemicals in them I immediately get a headache Headaches turn into migraines which leads to me trying to sleep them off. And leading to me putting off the cleaning.
However, I know that if I am to care for my home, and more importantly my family, I need to clean!
I do enjoy creating a clean, peaceful home environment (not a perfect one!). I just don't particular care for how I have to go about it.
So I decided to make my own cleaner!! I knew the bottle would have to be cute and fun, but I also knew the cleaner would have to smell good!
 |
| Don't you love my cute bottle?! |
I know what you are saying, "WOW, you sure went to a lot of work for a cleaning bottle!"(Brant said the same exact thing!!!)
Yes, as a matter of a fact I sure did! I don't like cleaning! So I thought maybe if I spent a little extra time making it cute and fun, that cute and fun would rub off on me in the cleaning department.
-Verdict still out-
I wipe down the kitchen counter so often this is cute enough to stay out for all to see.
Moving on to what I used......................Vinegar is great for cleaning, but the smell is not the greatest. My nose can handle citrus smells so I decided to add some citrus scents to my all purpose cleaner.
I used essential oils. Essential oils are ideal for adding to your cleaning supplies. They remove toxic mold, stale air, unpleasant odors, and kill viruses, bacteria and dust mites. Use essential oils that please your senses and at the same time deep clean you home.
I decided I would use two citrus scents. Lemon and Tangerine. Oh so yummy!!!
These are 100% pure essential oils. I like the Aura Cacia brand only because it is the only brand I have ever tried.
So I then had a recipe for Clean Blessings!
The name: blessing my family and home as I clean with natural products.
So here is the recipe and what you will need for Clean Blessings.
-distilled white vinegar
-essential oils(optional)
-a few drops of dish soap
-water
-a spray bottle
In a spray bottle add mainly vinegar with about a cup of water. Add 20-30 drops of each essential oil and a few drops of any dish soap. Shake well and CLEAN!!!!
That's it!
As far as the bottle I used chalkboard scrapbook paper and craft glue dots to stick it on. I bought the ribbon to match the bottle. I cut it to make a border around the "chalkboard". And then I had to add a cute bow!
And that folks is my attempt at making cleaning more FUN! Along with keeping my headaches away.
Do you make homemade cleaners? What do you use? I would love for you to share.
Wednesday, August 17, 2011

Tuesday, August 16, 2011
Things I love about Today
1. Waking up in my bed(we took an unexpected trip back home last week. Although it was great to see family, it is always nice to wake up in your own bed after being away for a few days!)
2. Everyone in our house is healthy today.
3. The love I received from all the comments from my last post!!!
**WOW! Thank you all for your kind words. I am NOT giving up on blogging, but do need to scale back a bit. I still have too much to share to stop!
What are you loving about your Tuesday?
2. Everyone in our house is healthy today.
3. The love I received from all the comments from my last post!!!
**WOW! Thank you all for your kind words. I am NOT giving up on blogging, but do need to scale back a bit. I still have too much to share to stop!
What are you loving about your Tuesday?
Tuesday, August 9, 2011
Thinking......
Why did I start blogging? With lots of crazy things going on in my life lately it has me thinking.
And "trying" to keep up with blogging and then I ask myself that question........why did I start blogging?
I have been desperately trying to post everyday. Something has to give.....or slow down drastically!
Do you ever get so overwhelmed with life? Do you ever feel the need to step back and just breathe?
Do you ever think you could change some things to make your life better?
Well I have.
I am taking a break this week from blogging. I need some time to think about the really important things in my life right now. Time to spend with God and pray for His best in my life.
Also a time to think about if I want to keep blogging as much as I have been.
When I started blogging it was not to see how many blog posts I could do in a week. Or to see how many "followers" I could get. Nor was it to get any kind of an award. And oh my it sure was not "trying" to find something to blog about.
Good grief! My life is full enough with two precious boys that I long to teach, entertain, nurture and love. Why on earth would I want to spend my days trying to come up with a blog post all for the sake of blogging???
I started blogging to share our story. To document our life for family miles away to see.
Somewhere this summer I got all caught up in wanting more....MORE and then even MORE.
From a blog?
So I am stepping back, looking at what I need to change and how I want to move forward with this blog.
I will likely take a long break and maybe even get ready for school after all our home repairs are done.
I am not gone completely just drastically slowing down on the blog front. Spending time with my Heavenly Father seeking His will. And enjoying some much needed time with my family.
And thinking..............

When will it end?
Today a foundation company will come to repair what the plumbing company damaged a couple of Fridays ago. You'll need to go here and here oh and here to get some background, but if you are up to speed let me fill you in on the latest.

Last time I posted about our unexpected project I let on that there was some damage. Just look at the picture above!
While the plumbers were jackhammering for 6-8 hours on that Friday they inadvertently cut a post tension cable in our foundation. This is not good! I will not go into the whole post tension slab, but think about it as it helps hold the foundation together and keeps it from shifting. It is under about 30,000 pounds of pressure/tension.

The cable shot out the back of our foundation/house. Concrete was found out in the yard. They were due to come back after the city inspected the new pipe.
The drain pipe had been replaced so everything was set for the city to come, inspect and give the plumbing company the green light. Or so they thought.

The inspector took one look down in the hole and saw there was no post tension cable. He saw the outside(the pictures you are seeing)of the house and "red tagged" the whole job until it is repaired.
We knew it was broken. We knew we had not had this damage to the outside of our home the day before they started jackhammering into our slab.
We also knew it could possibly cause some major problems.
The plumbing company was in disbelief that they had done this. Thank God for the city inspector!!!!

So today a foundation company will come out, cut more of the wood floor, jack hammer some more(inside and on the patio)and get this fixed.........I pray.
They say 2-3 hours which translate to me 4-5. Regardless of the time it will take I want it fixed!
I want this all to be over and move on. I don't want to keep asking myself, "When will it end?!"
Monday, August 8, 2011
Guest Post-Blissful and Domestic
Happy Monday to you! Today I have Danielle from Blissful and Domestic sharing with us. I found Danielle's blog last year during a link up at another blog. We connected and have kept up with each other ever since. I love visiting her blog(daily)to see all her repurposing ideas. And she shares some great recipes too! You must click on over, but first readers meet my blogging friend Danielle.
________________________________________________


________________________________________________
Hello lovelies! I am so excited to be here at One Day at a Time. Thanks Tasha for the opportunity to share with all your readers.

I am Danielle and my bloggy home is Blissful and Domestic.
That is where I share all my recipes, crafty projects, and re-purposing ideas.
I love re-purposing clothes and creating something new from something old. It is totally a fun challenge every time I look at a handmedown piece of clothing. I love how the wheels begin turning in my head, allowing me to come up with a little bit of fabulousness for my family. I also love baking and cooking. I love to create yumminess for my family.
Now with that being said I have a super easy, super yummy recipe to share with you today.
I don't know about you, but here in Vegas we are hitting triple digits everyday, so it is pretty dang hot outside.
When the temperature is that high you usually want to just sit in a pool with a cool treat. Well we don't have a pool, but I do have a great cool treat to share with you today.
This recipe is for Kool-Aid Slur-pees.
That's right who needs 7-11 when you can't create slur-pees at home.
Here is What You Need:

1 package of powdered kool-aid mix
your blender
ice
water
measuring cups
Here is What you Do:
your blender
ice
water
measuring cups
Here is What you Do:
Put 1 cup of water, 1 cup of ice, and 1/2 cup of kool-aid mix into your blender.
Blend together. Add more ice only if your mix needs to be a bit thicker, you should be fine though.
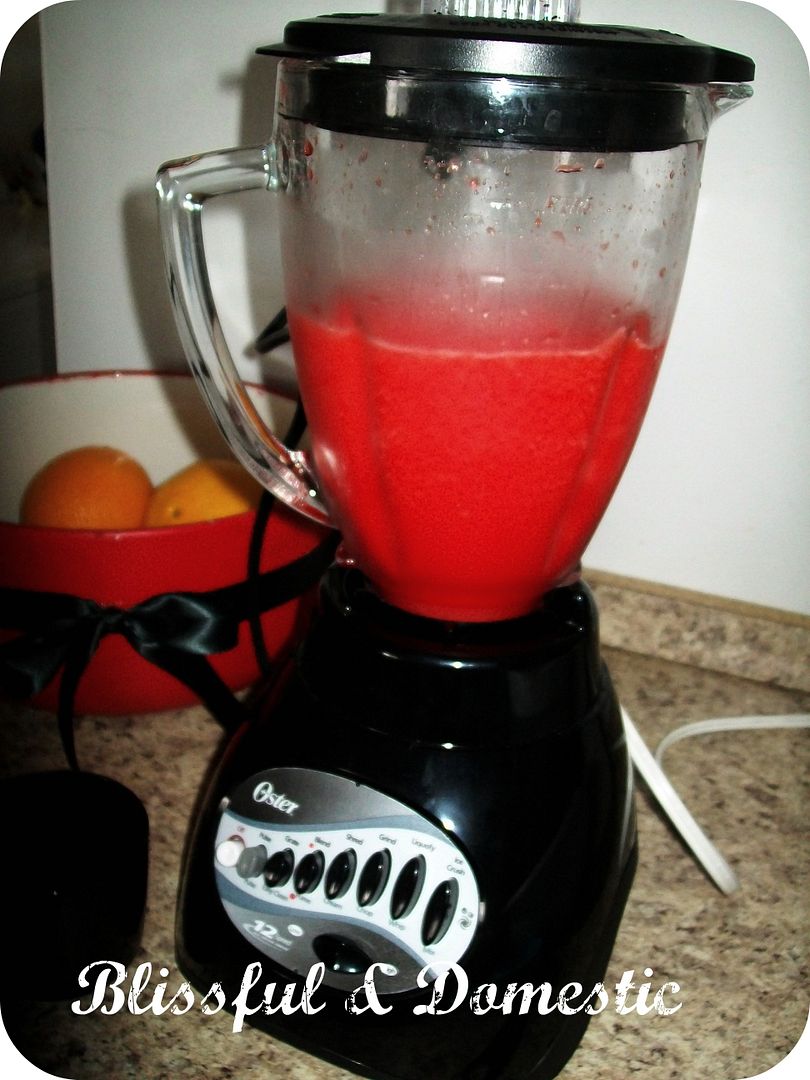
And there you have it a simple scrumptious slur-pee to share with your littles.

I hope you all get a chance to make these. Your children will love them, and hey why lie.... I love them and am always up for making them. Perfect on a hot summer day.
Thanks again Tasha for having me and for all you fabulous lovelies here at One Day at a Time.
Stop by sometime and say hi!
I'd love it.
Blissful and Domestic
Saturday, August 6, 2011
Wedding Fever
***Canceling Scrumptious Saturdays AGAIN! Too hot to think about cooking!! Check back next week for some guest posts.****
No it is not our anniversary. I just have Wedding Fever thanks to Melissa over at
I am linking up for this Wedding Fever FUN!
Just because I am madly in love with the greatest man in the whole wide world am I doing this for fun! And btw I would renew our vows in a heartbeat to have another wedding. I loved the whole day! I will not bore you with every little detail, although there are lots of exciting things to tell, I'll highlight some amazing and funny favorites.
Brant and I got married on April 17, 1999. I can remember as we started planning for it "1999" sounded so strange to everyone. We did start planning almost two years before so maybe that had something to do with it.
We were planning to pay for most of it ourselves so we needed that extra time. And I planned our wedding 6 hours away from where we would be getting married.
We got married in our home town.
In a fairy tale home that the day of the wedding we had full rein over......along with all our guests.
It sits on 88 acres of beautifully landscaped grounds. Since our wedding hurricanes have taken many of the trees giving it a totally different look. But I still remember it from our wedding day.

The actual ceremony took place in the solarium. It was set up with chairs for our guests and as soon as the ceremony was over it was transformed into the reception area. For a party I still smile about.
Here is my Daddy giving me away.

Music was something I wanted to have fun with at our wedding. I did the traditional wedding march down the aisle, but once the JP announced us husband and wife as we made our way back down the aisle Harry Conick Jr. sang "It had to be You".
We prepared for the receiving line(not sure many people have these anymore....maybe it is an old Southern thing)as our guest stood in line to greet us and give us their congrats.
The staff transformed the solarium into the reception area. Guests made their way to food and drinks and waited our arrival as Mr. and Mrs. Brant Fontenot.
The DJ announced our presents and we entered to the song "I can't see Me lovin nobody but You" by The Turtles. And then the party began.
We danced our first dance to "I Found Love" by Kenny Wayne Shepherd. We had the Groom and Mother dance.
And then..........it was time for the Father and Bride dance. The DJ ask everyone to gather around the dance floor. My heart was racing with excitement(just typing this I am getting all anxious!!!).
The DJ announced the Father and Bride dance was about to begin. And the music started!
Me and my Daddy danced to none other than "Disco Inferno" by The Trammps!!! It was a hoot! A blast! It got this reception started in a FUN way!!! We had planned it for months!!!!

The rest of the evening we danced and danced. Me and my high school friends danced while Brant and all the guys hung out on the massive porch in front smoking cigars.
The night finally came to end and it was time for us to go. We left the reception as the DJ played "Love Shack" by the B52s. And we were headed to Playa del Carmen.
As I look back it was such a FUN day!!!! Lots of laughs and HAPPY tears!!!! I have left out SO much, but these I suppose are the best memories that come to my mind today.


Burn Baby Burn!
Friday, August 5, 2011
It's sizzling HOT!
It is sizzling HOT around here these days!!!! We have hit some record highs that are crazy!!!
And while we are talking about things that are HOT someone thinks my blog is on fire!!!!

Thank you Melissa of MaMe Musings for awarding my blog the BLOG ON FIRE award!!!
I am truly flattered.
I love Melissa's blog and was so thrilled to get this award from her. You made my day.
Melissa and I have something in common. She and I are the proud Mommas of TWINS! You must visit her her blog and see her sweet babies. I love reading her blog and hearing all the stories about her babies as they grow. It takes me back to those younger years with the boys.
Now on to some FUN!!!!!!
1. I do not like to cook anymore, but LOVE to make yummy treats, snacks and desserts!
2. I do not watch TV. OK if you count falling asleep with the news entertainment on then I guess I do.
3. I save money in our grocery bill by not buying meat. We have meat for supper maybe 2-3 times a week.
4. I think boys are GROSS!
5. I am very frugal, but do splurge on make-up, skin care products and my hair. Anything else I buy is super cheap!! Or I find a really good sale!
6. I do not believe in good or bad luck.....I believe in God's will.
7. I LOVE to dance!!!
I have my old favorites of course, but have run across some new ones I am loving to explore!
Make sure to check all these blogs out!!!!!
Come back later for a FUN Friday post!!!
Thursday, August 4, 2011
Apple and Nutella Frogs
I think children of all ages will LOVE these frogs! And they are a quick and healthy lunch or snack.
First off you can't go wrong with Nutella. I prefer the crunchy and have a secret.......Kroger brand taste exactly the same to me. No one will know if you don't tell.
Here is what you will need.........
 Granny Smith apples
Nutella or store brand hazelnut spread
(you could also use peanut butter)
green seedless grapes
chocolate chips(or any kind you have on hand)
I only used one apple because I went for the BIG ones!
Cut the apple into quarters. Remove the core and slice each quarter into 2 so you have 8 slices.
Note: when making for the boys I only make one frog each.
Place the apple slices on a serving plate and scoop a line of the Nutella on the thick end of the apple wedge. Top with a second piece of apple and add 2 dollops for the "eyes" onto the top slice.
To finish the "eyes" take a toothpick and thread on a grape and top with a chocolate chip. Push the other end of the toothpick through the apples to secure.
Ribbit, Ribbit..........isn't he CUTE!!!! He only stayed cute for a very short time and then his eyes came off. It is at that point I just have a plate of apples, a bowl of grapes and spoon Nutella on the plate. Oh and a few chocolate chips!!!
 Tips:
Tips:
-If you use peanut butter instead of the Nutella add 1/2 cup cream cheese and 2 tablespoons of powdered sugar....makes it really good!
-Also it might be a good idea not to wear white pants when making these.
Hope you enjoy the FROGS!!!!
Thanks for taking the time to read about my apple and Nutella frogs! A double thank you for leaving me a comment letting me what you think. And a triple thank you for hitting the "follow" button on the sidebar!!!!
First off you can't go wrong with Nutella. I prefer the crunchy and have a secret.......Kroger brand taste exactly the same to me. No one will know if you don't tell.
Here is what you will need.........

Nutella or store brand hazelnut spread
(you could also use peanut butter)
green seedless grapes
chocolate chips(or any kind you have on hand)
I only used one apple because I went for the BIG ones!
Cut the apple into quarters. Remove the core and slice each quarter into 2 so you have 8 slices.
Note: when making for the boys I only make one frog each.
Place the apple slices on a serving plate and scoop a line of the Nutella on the thick end of the apple wedge. Top with a second piece of apple and add 2 dollops for the "eyes" onto the top slice.
To finish the "eyes" take a toothpick and thread on a grape and top with a chocolate chip. Push the other end of the toothpick through the apples to secure.
 |
| I did not use the toothpicks this time.....it works out fine if eaten quickly. |
Ribbit, Ribbit..........isn't he CUTE!!!! He only stayed cute for a very short time and then his eyes came off. It is at that point I just have a plate of apples, a bowl of grapes and spoon Nutella on the plate. Oh and a few chocolate chips!!!

-If you use peanut butter instead of the Nutella add 1/2 cup cream cheese and 2 tablespoons of powdered sugar....makes it really good!
-Also it might be a good idea not to wear white pants when making these.
Hope you enjoy the FROGS!!!!
Thanks for taking the time to read about my apple and Nutella frogs! A double thank you for leaving me a comment letting me what you think. And a triple thank you for hitting the "follow" button on the sidebar!!!!
Wednesday, August 3, 2011
Cold Pasta Salad
This is our 33rd consecutive day of temps over and well above 100 degrees. It is sizzling HOT!!!
When it is that hot who wants to cook? NOT ME! When I went to the grocery store on Sunday I went knowing everything I would buy would have to be made, prepared or cooked on top of the stove. NO oven this week!!!
So here is my Greek Pasta Salad. There are two ingredients you must have to make this salad. And I think they are what make it so yummy. Greek dressing and feta cheese!!!! I'll tell you the other ingredients I use, but I think the Greek dressing and feta are a must!!!!
 Ingredients:
2 types of pasta
black olives
purple onion
bell pepper
Greek dressing
feta cheese
Chop your onion and bell pepper to desired size. I prefer pretty small. I buy the sliced black olives, but you could use the chopped. On the bell pepper you could use any color. This time I went with the green because they were 88 cents each and the yellow, orange or red were $1.99 each.
Anyway add all veggies to a big bowl for mixing later.
Cook pasta according to box. Rinse with cold water and add to veggies.
Next add feta cheese. I like a lot, but this a strong, funky cheese so you use what taste right to you.
Now add the dressing.......I always go light. You can always add more later. Stir and taste.
Don't forget salt and pepper to too!
 Serve with bread sticks, crackers or alone. YUM! Pasta salads are so versatile making it a great dish to try different veggies. SUPER easy which you know is a must for me. And relatively healthy......by the way I use whole wheat pasta.
And that is summer eating when it is 110 degrees outside!!!!!!!
When it is that hot who wants to cook? NOT ME! When I went to the grocery store on Sunday I went knowing everything I would buy would have to be made, prepared or cooked on top of the stove. NO oven this week!!!
So here is my Greek Pasta Salad. There are two ingredients you must have to make this salad. And I think they are what make it so yummy. Greek dressing and feta cheese!!!! I'll tell you the other ingredients I use, but I think the Greek dressing and feta are a must!!!!

2 types of pasta
black olives
purple onion
bell pepper
Greek dressing
feta cheese
Chop your onion and bell pepper to desired size. I prefer pretty small. I buy the sliced black olives, but you could use the chopped. On the bell pepper you could use any color. This time I went with the green because they were 88 cents each and the yellow, orange or red were $1.99 each.
Anyway add all veggies to a big bowl for mixing later.
Cook pasta according to box. Rinse with cold water and add to veggies.
Next add feta cheese. I like a lot, but this a strong, funky cheese so you use what taste right to you.
Now add the dressing.......I always go light. You can always add more later. Stir and taste.
Don't forget salt and pepper to too!

And that is summer eating when it is 110 degrees outside!!!!!!!
Tuesday, August 2, 2011
Bench Project
Last week I showed you a list of projects I was going to start working on.
Well I never did get around to the boys' bulletin board, but I did decoupage the bench!!
I had never decoupaged anything, but figured it couldn't be that hard so I decided to do the top of the bench. You may remember me saying I was bored with the green color of the bench. After looking at the distressed finish I had created I was so afraid I may not be able to get the same look again if I painted it shabby white.
So I decided to leave it green and decoupage the top.
Here is the bench before.

And here is the bench now.

What do you think? I love the new look!!!
It sits in a long dark hallway so this was just enough to brighten up the area. And add that whimsical look I so love!
So here is what I used and how I did it. I am sure many of you have used Mod Podge before so bare with me for all those that have not. And I would love helpful hints if you have any!
 Besides a drop clothe this is all I used. And the cost was great! Mod Podge was $4.49 and the scrapbook paper was half off(reguralry 59 cents)both at Hobby Lobby. I already had the sponge brushes and of course the bench!
I started by wiping the bench down and drying it off. I then cut my scrap book paper in all different sizes.
Then I started applying a thin layer of Mod Podge to the bench. I started on the outside and corners of the bench carefully laying my paper out to the edge.......I did overlap the paper.
 As I layed a piece down I made sure to get out any little air bubbles by smoothing the paper out. From one side to the other.
 This was harder than I thought. Next time I will be sure to take more time to do this process. I was just SO excited about seeing the end result. Because of my excitement I totally forgot to take more pictures of the progrees as I went along. But I feel confident you can see how this was done.
After I layed all the paper to the edges of the bench I then got crazy with more overlapping. I think this is where the FUN begins. There is no ryhme or reason to the way I did this. I simply put a piece down, stepped back to see if that worked and glued it(Mod Podge).

After I had the bench to the desired look I then went over the entire bench with Mod Podge again. This bench is really not used to sit on.....more like a funky piece to add something to our hall. If I used it more for seating I would probably put a top coat over all this. Something to protect it.

Everytime I walked past this bench in the hallway I smile. I love the way it came out!! And it was so easy to do. Now I am walking around looking for more things to decoupage.

Well I never did get around to the boys' bulletin board, but I did decoupage the bench!!
I had never decoupaged anything, but figured it couldn't be that hard so I decided to do the top of the bench. You may remember me saying I was bored with the green color of the bench. After looking at the distressed finish I had created I was so afraid I may not be able to get the same look again if I painted it shabby white.
So I decided to leave it green and decoupage the top.
Here is the bench before.

And here is the bench now.

What do you think? I love the new look!!!
It sits in a long dark hallway so this was just enough to brighten up the area. And add that whimsical look I so love!
So here is what I used and how I did it. I am sure many of you have used Mod Podge before so bare with me for all those that have not. And I would love helpful hints if you have any!

I started by wiping the bench down and drying it off. I then cut my scrap book paper in all different sizes.
Then I started applying a thin layer of Mod Podge to the bench. I started on the outside and corners of the bench carefully laying my paper out to the edge.......I did overlap the paper.


After I layed all the paper to the edges of the bench I then got crazy with more overlapping. I think this is where the FUN begins. There is no ryhme or reason to the way I did this. I simply put a piece down, stepped back to see if that worked and glued it(Mod Podge).

After I had the bench to the desired look I then went over the entire bench with Mod Podge again. This bench is really not used to sit on.....more like a funky piece to add something to our hall. If I used it more for seating I would probably put a top coat over all this. Something to protect it.

Everytime I walked past this bench in the hallway I smile. I love the way it came out!! And it was so easy to do. Now I am walking around looking for more things to decoupage.

**On a different subject.....my followers are growing!!!! Thank you so much for reading my blog. And following our story!! I love to write and share all that I do. And I love reading your comments too! Keep them coming! Maybe a new month will bring me more followers. If you read my blog I would love for you to join in that list of followers!! **
Subscribe to:
Posts (Atom)