I am almost having spring fever!!!
I really did not want to admit it, but with all the warmer than usual weather we have been having lately I just can't help it!
I even painted my toenails after months of no color! Hot pink of course.
And I have been wearing flip flops off and on for a few weeks!
I fear winter is not over though. And don't get me wrong I would not mind another month of cold temps. I love to stay indoors and bundle up, but having these days here and there make me almost long for spring.
Yearning for spring.........
planting a new garden, seeing flowers and green grass start to sprout, Easter, Starburst jellybeans, bright colors in clothing, bare feet, nice days to play outdoors, sushi(I love sushi better in the spring and summer!), picnics at the park, nature walks, bike rides, leaving the backdoor open, opening windows to air out the house, grilling more for supper, hanging on the patio, longer days to play outdoors.
OK OK I MUST STOP!!!!!
I just might be getting ahead of myself, but it sure is nice to think of all the amazing things that spring can bring. And to think they are not that far away.
I'll take our 70+ degree day today and wear my flip flops with hot pink toes. And tomorrow I'll be just as happy to put back on my boots! That is just how we do it in Texas!
There is a saying in Texas: If you don’t like the weather, wait a minute and it’ll change.
Tuesday, January 31, 2012
Monday, January 30, 2012
Tea with a little ♥ LOVE ♥

I just love this idea and found it on Martha Stewart's site. There are a ton of great Valentine's Day ideas.
All you need for this is construction paper, tape(I love glue dots), a marker/pen and tea bags.
I simply removed the tea brand tag and added my heart tag.
I traced 2 hearts for each bag. After I removed the tea brand tag I placed the tea bag string on one heart, placed a glue dot over the string and placed the other heart on top of the glue dot.
That is it.
Tea with a little ♥ LOVE ♥.
Saturday, January 28, 2012
Simple birthday celebration
Yesterday we celebrated Brant's 44th birthday.
In keeping with my desires for this year we kept it simple.
As soon as the boys woke up they remembered the BIG card they had made Daddy the night before. They ask Daddy to cover his eyes and we brought out this card.

They were so excited to give their Daddy his BIG card!!! We hung it right in front of his office.
And then they had to make regular sized cards. While Daddy went fishing the boys made him fishing cards. Brant and I buy each other cards, but make a point to not waste money on cards from the boys. Simply because they enjoy making them, they cost too much and we love seeing what they come up with. Bonus: it is another way to live simple.
The birthday continued with sports, pizza and a good beer. As I prepared the pizza Brant and the boys played Wii. Not only did the birthday boy go fishing on his bday he also got to play golf!

Later my sister and BIL came over for cake and ice cream. If you missed my post about the cake search my blog for Chocolate Sheet Cake! It is SO SIMPLE to make and oh so YUMMY!!! With almost 4 sticks of butter and over a pound of sugar it must be good!!!!
It was a simple birthday celebration, but it was just what we enjoy.

In keeping with my desires for this year we kept it simple.
As soon as the boys woke up they remembered the BIG card they had made Daddy the night before. They ask Daddy to cover his eyes and we brought out this card.

And then they had to make regular sized cards. While Daddy went fishing the boys made him fishing cards. Brant and I buy each other cards, but make a point to not waste money on cards from the boys. Simply because they enjoy making them, they cost too much and we love seeing what they come up with. Bonus: it is another way to live simple.
The birthday continued with sports, pizza and a good beer. As I prepared the pizza Brant and the boys played Wii. Not only did the birthday boy go fishing on his bday he also got to play golf!

Later my sister and BIL came over for cake and ice cream. If you missed my post about the cake search my blog for Chocolate Sheet Cake! It is SO SIMPLE to make and oh so YUMMY!!! With almost 4 sticks of butter and over a pound of sugar it must be good!!!!
It was a simple birthday celebration, but it was just what we enjoy.

Friday, January 27, 2012
Happy Birthday Honey!!!
The honey I am referring to is my amazing, strong, determined, faithful, supportive and pretty darn handsome 44 year old husband!!!! Age is good to you honey!
Happy Birthday Brant!!!!!
And Happy Birthday to his twin brother Brent!!!!
We(meaning me and the boys)love birthdays around here!!!
A birthday on Friday can mean only one thing.........FUN FRIDAY!!!!!!!
We have FUN Fridays around here from time to time and I think a birthday deserves a FUN day. The boys have been taught early that birthdays are a BIG deal and usually a holiday around our house.
School will short today so we can have plenty of time to spend with the birthday boy.
This evening it will be our usual pizza night. Then family will come over later for cake and ice cream.
And this is not just any cake. This is Chocolate Sheet Cake. You can find the recipe here ........it is a birthday tradition!
The weather is suppose to be nice so I will almost bet our FUN Birthday Friday will be outdoors!!!
What we will do has yet to be determined.......that is up to the BIRTHDAY boy!!!!
Maybe I'll have some birthday pictures to share tomorrow.
Happy Friday to you all, do something FUN and get OUTSIDE!!!!!!
Thursday, January 26, 2012
Thankful Thursday-Rain Barrels
We started getting rain late in the day on Tuesday. It rained all night and part of the day Wednesday. It is Thursday morning and it is raining again. As of last night we had received 4 1/2 inches.of rain.
It is the perfect time to test the rain barrels.
 Brant has been wanting to do this for a while and a few weeks back he got them all set up. He had a minor set back with a leak, but they are all fixed up now and taking in the rain......I pray. We'll check later.
We did not buy the barrels as rain barrels. Brant bought the barrels off Craigslist, added parts here and there...basically did his handy work. I hope once we know they are working well he will do a guest post explaining what he did for anyone interested.
 For now take a look at the pictures....I think they explain it all.

We will then use this water for our gardens. Fresh, FREE rain water from God!
 By the way we had record rainfall yesterday. It is nice to finally have our lakes receive some much needed water.

It is killing the boys to not go out and jump in the puddles and mud. Too cold I think, but you never know when I might cave!
This last picture shows where we can connect a garden hose in order to water the gardens. It will be so nice to have this water for our gardens in the spring!
I'll post soon to tell you how the barrels are working.

It is the perfect time to test the rain barrels.

We did not buy the barrels as rain barrels. Brant bought the barrels off Craigslist, added parts here and there...basically did his handy work. I hope once we know they are working well he will do a guest post explaining what he did for anyone interested.


We will then use this water for our gardens. Fresh, FREE rain water from God!


It is killing the boys to not go out and jump in the puddles and mud. Too cold I think, but you never know when I might cave!
This last picture shows where we can connect a garden hose in order to water the gardens. It will be so nice to have this water for our gardens in the spring!
I'll post soon to tell you how the barrels are working.

I am thankful today for RAIN, a very handy husband and being indoors!
Happy Thursday!
Wednesday, January 25, 2012
Homemade Biscuits
Seriously, I can not believe how simple these are to make. I never knew! To think I have been buying those things in a can for years. We don't eat biscuits that much, but when we did I bought the ones in a can.
Well NOT anymore!!! I will never buy can biscuits again!
If you have been following my blog since the new year you know I have been on a mission to make more things homemade.
I have a list of things I have either always wanted to learn to make homemade OR things we eat often that I want to learn how to make homemade.
Whatever the reason every time I make homemade I am amazed I never tried it before. And the homemade biscuits were just the same.
I think we might be eating them more often now! Actually we have had them twice in less than two weeks! You could say my family likes them. And really you can't compare homemade biscuits to the can biscuits.
I found this recipe in my old Better Homes and Garden Cookbook. I looked for the same recipe online through Better Homes' site, but it seems they have changed it up a bit. I will give you the "old" one.
Older recipes are usually better anyway.
These took me about 10 minutes to prepare and then 10 minutes to bake. I end up getting 12 biscuits...the recipe says 10.
If you have never made homemade biscuits you must try these soon! Fresh from the oven with butter and honey or smothered in a sausage gravy, your family will thank you!
Biscuits
2 cups all-purpose flour
1 tablespoon baking powder
2 teaspoon sugar
1/2 teaspoon cream of tartar
1/4 teaspoon salt
1/2 cup unsalted butter
2/3 cup milk
In a bowl stir together flour, baking powder, sugar, cream of tartar and salt. Cut in butter till mixture looks like coarse crumbs. Make a well in the center; add milk all at once. Stir just till dough clings together.
On a lightly floured surface, kneed dough gently for 10 to 12 strokes. Roll or pat down to 1/2-inch thickness. Cut with a 2 1/2 inch biscuit cutter, dipping cutter into flour between cuts.
Transfer biscuits to a baking sheet. Bake in a 450 oven for 10 to 12 minutes or till golden.
NOTE: I use the top of a Mason jar as a "biscuit cutter".
I made a pan of 12 last night for supper. This is what was left. They love them!
Well NOT anymore!!! I will never buy can biscuits again!
 |
| Nothing beats homemade! |
If you have been following my blog since the new year you know I have been on a mission to make more things homemade.
I have a list of things I have either always wanted to learn to make homemade OR things we eat often that I want to learn how to make homemade.
Whatever the reason every time I make homemade I am amazed I never tried it before. And the homemade biscuits were just the same.
I think we might be eating them more often now! Actually we have had them twice in less than two weeks! You could say my family likes them. And really you can't compare homemade biscuits to the can biscuits.
I found this recipe in my old Better Homes and Garden Cookbook. I looked for the same recipe online through Better Homes' site, but it seems they have changed it up a bit. I will give you the "old" one.
Older recipes are usually better anyway.
These took me about 10 minutes to prepare and then 10 minutes to bake. I end up getting 12 biscuits...the recipe says 10.
If you have never made homemade biscuits you must try these soon! Fresh from the oven with butter and honey or smothered in a sausage gravy, your family will thank you!
Biscuits
2 cups all-purpose flour
1 tablespoon baking powder
2 teaspoon sugar
1/2 teaspoon cream of tartar
1/4 teaspoon salt
1/2 cup unsalted butter
2/3 cup milk
In a bowl stir together flour, baking powder, sugar, cream of tartar and salt. Cut in butter till mixture looks like coarse crumbs. Make a well in the center; add milk all at once. Stir just till dough clings together.
On a lightly floured surface, kneed dough gently for 10 to 12 strokes. Roll or pat down to 1/2-inch thickness. Cut with a 2 1/2 inch biscuit cutter, dipping cutter into flour between cuts.
Transfer biscuits to a baking sheet. Bake in a 450 oven for 10 to 12 minutes or till golden.
NOTE: I use the top of a Mason jar as a "biscuit cutter".
 |
| The part on the right of course. |
 |
| I wonder who will get this last one? |
Tuesday, January 24, 2012
Playing with hearts
I have been playing with hearts.
And anything red, pink or white(or yellow). Oh and purple too!! And anything that is sweet and looks like it might be for Valentine's Day.

Yep, the love bug has hit me!
I found my Valentine's Day stash and Matthew is in Heaven! Ryan doesn't really care.
I am trying real hard to hold off on all the sweets until the week before.
No promises, but my sister and I are thinking of doing homemade truffles. YUM! Of course there will be the cupcakes the boys always insist we have for a Valentine's Day school party. And this year I will be making HOMEMADE cupcakes and icing. No store bought this year. Surely it can't be that hard!!!!
And then there are the cards...........
My favorite part! I don't have a long list, but there are a few special people I consider to be my Valentine. ♥ ♥ ♥


I'll share more later!
Are you playing with hearts yet? What are your crafts for Valentine's day? I would love to share them if you have blog. Feel free to leave me a comment. I would love to show you some blogging love and highlight your fun.
Happy Tuesday!
And anything red, pink or white(or yellow). Oh and purple too!! And anything that is sweet and looks like it might be for Valentine's Day.

Yep, the love bug has hit me!
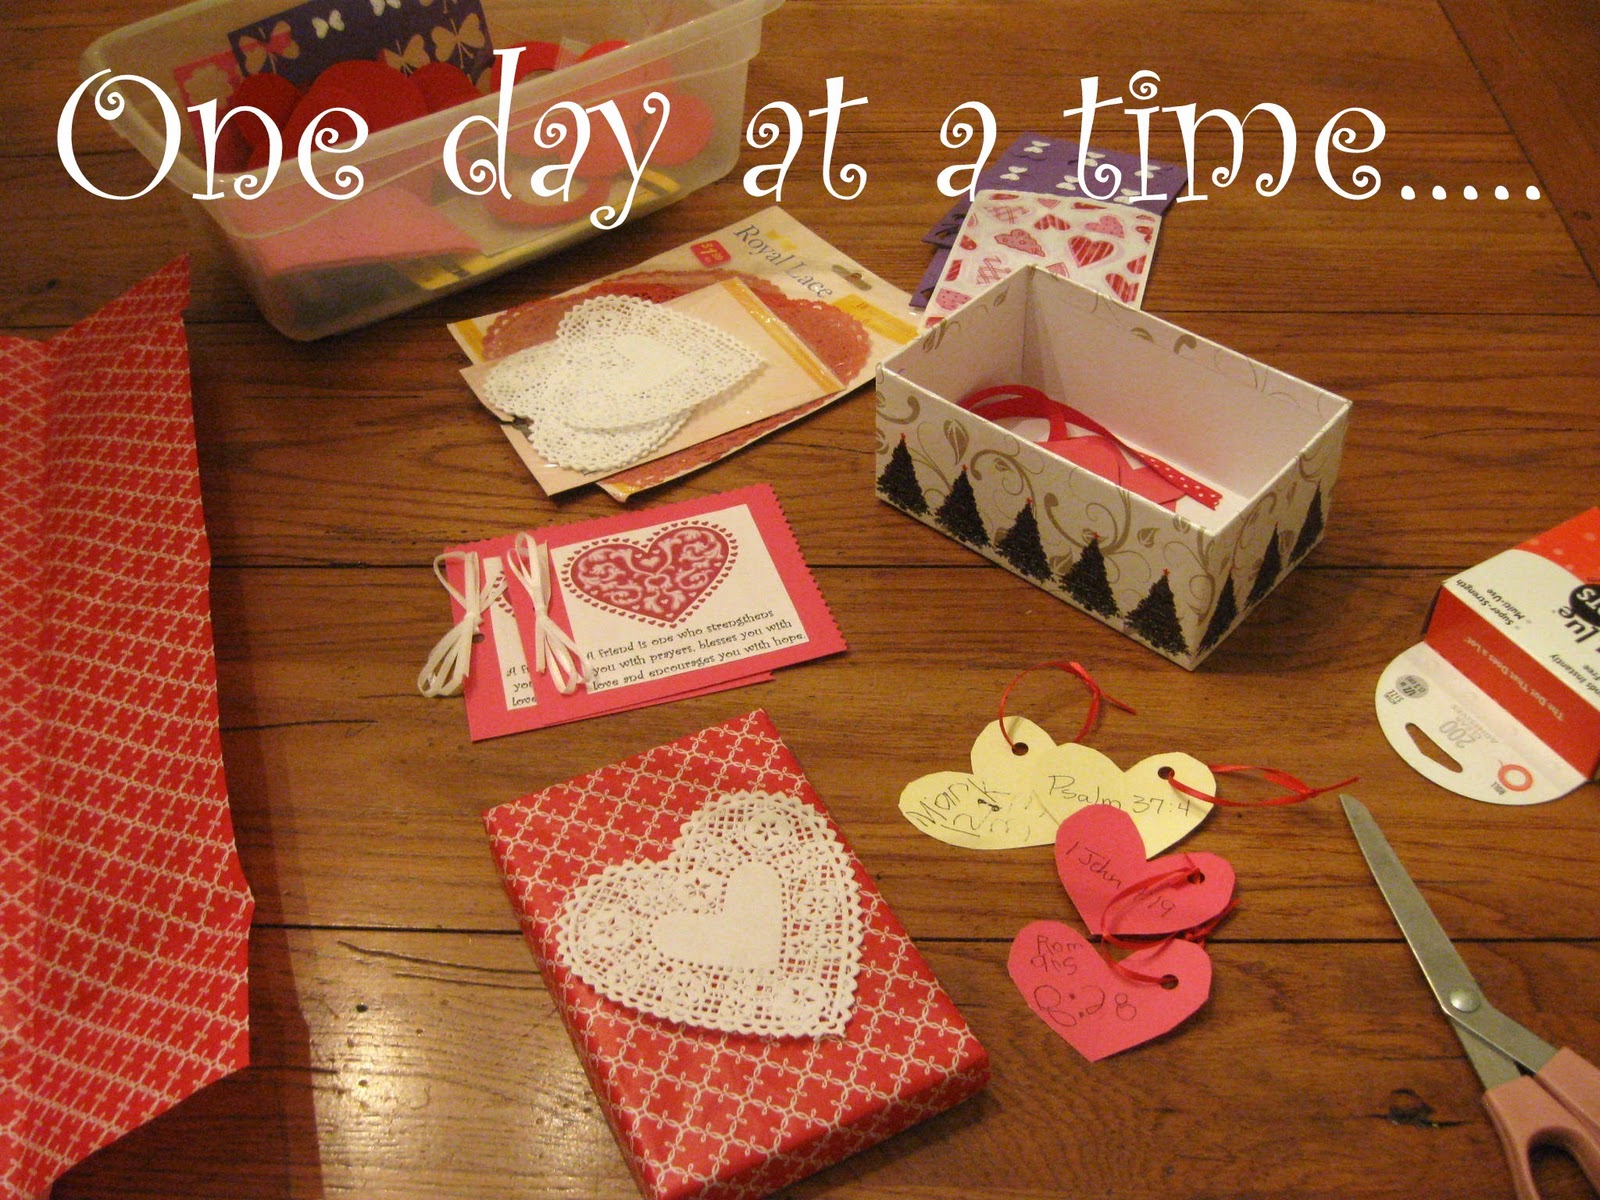 |
| All the makings for a Valentine's mailbox! |
I found my Valentine's Day stash and Matthew is in Heaven! Ryan doesn't really care.
 |
| Matthew's work of course! |
I am trying real hard to hold off on all the sweets until the week before.
No promises, but my sister and I are thinking of doing homemade truffles. YUM! Of course there will be the cupcakes the boys always insist we have for a Valentine's Day school party. And this year I will be making HOMEMADE cupcakes and icing. No store bought this year. Surely it can't be that hard!!!!
And then there are the cards...........
My favorite part! I don't have a long list, but there are a few special people I consider to be my Valentine. ♥ ♥ ♥


Are you playing with hearts yet? What are your crafts for Valentine's day? I would love to share them if you have blog. Feel free to leave me a comment. I would love to show you some blogging love and highlight your fun.
Happy Tuesday!
Saturday, January 21, 2012
Homemade Parmesan Bread
You've come a long way baby!
Well maybe those were not his exact words......he left off baby. But he did say it!
I am talking about my very patient husband who has waited for years for me to get back in kitchen! To cook!!!!
You may remember me talking about wanting to make more things homemade and learned to make more breads. Well baby, I got it!
Ialmost have this bread making thing!!! And by hand!!! Still no machine!
He made a comment yesterday and said, "You have come a long way". And I have! He was referring to me in the kitchen. Trying new things and just basically being in the kitchen more often!
Sorry to sound like I am patting myself on the back, but you have no idea just how far I have truly come. After the boys were born(2005)I pretty much walked away from doing anything in the kitchen. Oh sure I made very simple meals, but was not in the least bit interested in trying new things.
But things have changed!!!!
I think the most important part in all of this is, I am enjoying it.
I am loving my time in the kitchen.
And I am feeling more confident. That is a big help!
I still have those moments where I totally mess up and get very uneasy about cooking. But when I do mess up, I try to figure it out. If that means consulting with the experts(wonderful husband, Mom, sister-in-law, nieces or friends)then I just do it. And we all know that you learn best when you do make a mistake.
OK enough of all that. I must share this amazing bread recipe.
We love bread and we love cheese. The two together make my mouth water. My first yeast bread was a cheese bread, but it was just not cheesy enough.
Well this one is not the same!!!! It is super cheesy! So I will warn you....you must like cheesy madness.
I found this recipe in the Southern Living Annual Recipes Cookbook-20th Anniversary Edition.
It was submitted by Velma McGregor in Gretna, Virginia. If you know Velma please tell her thanks for the recipe! And ask if she has anymore she wants to share.
It is so full of flavor. And tasted very much like some of those bakery breads full of yummy stuff. The only difference here is this was ALL homemade and I can pronounce every ingredient in the recipe! Score for homemade!!!!
The house was smelling so delicious as it baked!!!! And since this is now my 3rd bread making experience I can say it was not bad at all. Pretty simple.
So here is the recipe. Hope you get a chance to make it soon!
Parmesan Bread
1(1/4 ounce)envelope active dry yeast
1 cup warm water(105* to 115*)
3 cups all-purpose flour, divided
1/4 cup butter melted
1 large egg, beaten
2 tablespoons sugar
2 teaspoons dried onion flakes
1 teaspoon salt
1 teaspoon dried Italian seasoning
1/2 teaspoon garlic powder
2/3 cup grated Parmesan cheese, divided
1 tablespoon butter, melted
~Combine yeast and warm water in a 2-cup liquid measuring cup; let stand for 5 minutes.
~Combine yeast mixture, 2 cups flour, 1/4 cup butter, and next 6 ingredients in a large mixing bowl. Beat at medium speed with an electric mixer for 2 minutes.
Gradually stir in 1/3 cup Parmesan cheese and remaining 1 cup flour to make a soft dough.
~Cover and let rise in a warm place, free from drafts, 1 hour or until doubled in size.
~Punch dough down, and place in a greased 2-quart casserole. Brush with 1 tablespoon of melted butter; sprinkle with remaining 1/3 cup of cheese.
~Cover and let rise in a warm place, 45 minutes or until doubled.
~Bake at 350 for 30 minutes or until golden. Let cool in casserole on a wire rack for 10 minutes. Remove bread from casserole, and let cool completely on wire rack.
Yield: 1 loaf
Enjoy!
Well maybe those were not his exact words......he left off baby. But he did say it!
I am talking about my very patient husband who has waited for years for me to get back in kitchen! To cook!!!!
You may remember me talking about wanting to make more things homemade and learned to make more breads. Well baby, I got it!
I
He made a comment yesterday and said, "You have come a long way". And I have! He was referring to me in the kitchen. Trying new things and just basically being in the kitchen more often!
Sorry to sound like I am patting myself on the back, but you have no idea just how far I have truly come. After the boys were born(2005)I pretty much walked away from doing anything in the kitchen. Oh sure I made very simple meals, but was not in the least bit interested in trying new things.
But things have changed!!!!
I think the most important part in all of this is, I am enjoying it.
I am loving my time in the kitchen.
And I am feeling more confident. That is a big help!
I still have those moments where I totally mess up and get very uneasy about cooking. But when I do mess up, I try to figure it out. If that means consulting with the experts(wonderful husband, Mom, sister-in-law, nieces or friends)then I just do it. And we all know that you learn best when you do make a mistake.
OK enough of all that. I must share this amazing bread recipe.
 |
| Look at all that CHEESE! |
We love bread and we love cheese. The two together make my mouth water. My first yeast bread was a cheese bread, but it was just not cheesy enough.
Well this one is not the same!!!! It is super cheesy! So I will warn you....you must like cheesy madness.
I found this recipe in the Southern Living Annual Recipes Cookbook-20th Anniversary Edition.
It was submitted by Velma McGregor in Gretna, Virginia. If you know Velma please tell her thanks for the recipe! And ask if she has anymore she wants to share.
It is so full of flavor. And tasted very much like some of those bakery breads full of yummy stuff. The only difference here is this was ALL homemade and I can pronounce every ingredient in the recipe! Score for homemade!!!!
The house was smelling so delicious as it baked!!!! And since this is now my 3rd bread making experience I can say it was not bad at all. Pretty simple.
So here is the recipe. Hope you get a chance to make it soon!
Parmesan Bread
1(1/4 ounce)envelope active dry yeast
1 cup warm water(105* to 115*)
3 cups all-purpose flour, divided
1/4 cup butter melted
1 large egg, beaten
2 tablespoons sugar
2 teaspoons dried onion flakes
1 teaspoon salt
1 teaspoon dried Italian seasoning
1/2 teaspoon garlic powder
2/3 cup grated Parmesan cheese, divided
1 tablespoon butter, melted
~Combine yeast and warm water in a 2-cup liquid measuring cup; let stand for 5 minutes.
~Combine yeast mixture, 2 cups flour, 1/4 cup butter, and next 6 ingredients in a large mixing bowl. Beat at medium speed with an electric mixer for 2 minutes.
Gradually stir in 1/3 cup Parmesan cheese and remaining 1 cup flour to make a soft dough.
~Cover and let rise in a warm place, free from drafts, 1 hour or until doubled in size.
~Punch dough down, and place in a greased 2-quart casserole. Brush with 1 tablespoon of melted butter; sprinkle with remaining 1/3 cup of cheese.
~Cover and let rise in a warm place, 45 minutes or until doubled.
~Bake at 350 for 30 minutes or until golden. Let cool in casserole on a wire rack for 10 minutes. Remove bread from casserole, and let cool completely on wire rack.
Yield: 1 loaf
Enjoy!
Friday, January 20, 2012
A special ball of yarn
A speical ball of yarn to bless a friend or loved one.
I first saw this idea last year on a blog I follow, Homespun Heart . Monica has a true gift! A true gift from God!
I loved her idea and kept it locked away in my head knowing one day I would use it.
Right now was the perfect time!
I have a friend who is going through some life changing times right now.....hard times. I knew she might need a little encouragement and to know God is loving her through it all.
Here is what I did...........
All of this I had in my stash. A tin heart, brown yarn, scrapbook paper and ribbon. You could use any color combo you want or love. And you could easily make a heart out of scrapbook paper.
 I wrote the words above on scrapbook paper and cut them out. Then I slowly started wrapping the heart with yard.

After I had a little yarn around the heart I started adding the words.
 I wrapped and wrapped yarn until it came out a ball and looked like this.
I then made a card to put with the ball of yarn. I don't have a picture of the card, but I typed out what I wanted it to say and applied it to brown scrapbook paper.
Here is part of what it said..................
~~~~~~~~~~~~~~~~~~~~~~~~~~~~~~~~~~~~~
Friend,
I know this is a tough time right now in your life. I wanted you to know I am praying for you. And to give you a little something to show God is there.
It is a little ball of yarn, but deep inside, all the way in the middle, there is a heart. Your heart. You can hold this little ball in your hand and remember that God holds you just like this and He surrounds your heart with comfort and protection.
When you are starting to feel like you are coming apart, feel free to unwrap the yarn. You can wrap it and unwrap it as many times as you want. Inside you will find reminders of what God surrounds you with and wraps your heart with.
~His love, his comfort, his peace, his strength, his hope and his grace.
And, seeing your name on the outside - may it remind you that He holds you and surrounds you. He wraps Himself around you and provides you with everything good. I hope this does not seem trite in your time of hurt and struggle. But, instead - a tangible reminder of who God is. The way He holds you.
~~~~~~~~~~~~~~~~~~~~~~~~~~~~~~~~~~~~~
I hope you can also take Monica's wonderful idea and bless a friend or loved one with a special ball of yarn.
Happy Friday!!!!
I first saw this idea last year on a blog I follow, Homespun Heart . Monica has a true gift! A true gift from God!
I loved her idea and kept it locked away in my head knowing one day I would use it.
Right now was the perfect time!
I have a friend who is going through some life changing times right now.....hard times. I knew she might need a little encouragement and to know God is loving her through it all.
Here is what I did...........
All of this I had in my stash. A tin heart, brown yarn, scrapbook paper and ribbon. You could use any color combo you want or love. And you could easily make a heart out of scrapbook paper.


After I had a little yarn around the heart I started adding the words.

 |
Here is part of what it said..................
~~~~~~~~~~~~~~~~~~~~~~~~~~~~~~~~~~~~~
Friend,
I know this is a tough time right now in your life. I wanted you to know I am praying for you. And to give you a little something to show God is there.
It is a little ball of yarn, but deep inside, all the way in the middle, there is a heart. Your heart. You can hold this little ball in your hand and remember that God holds you just like this and He surrounds your heart with comfort and protection.
When you are starting to feel like you are coming apart, feel free to unwrap the yarn. You can wrap it and unwrap it as many times as you want. Inside you will find reminders of what God surrounds you with and wraps your heart with.
~His love, his comfort, his peace, his strength, his hope and his grace.
And, seeing your name on the outside - may it remind you that He holds you and surrounds you. He wraps Himself around you and provides you with everything good. I hope this does not seem trite in your time of hurt and struggle. But, instead - a tangible reminder of who God is. The way He holds you.
~~~~~~~~~~~~~~~~~~~~~~~~~~~~~~~~~~~~~
I hope you can also take Monica's wonderful idea and bless a friend or loved one with a special ball of yarn.
Happy Friday!!!!
Thursday, January 19, 2012
Thankful Thursday
Today I am thankful for.................
-An early morning up all alone. I love to sit, read my Bible, drink my coffee and think of all the many blessings God has given me.

-A pizza cutter. It makes cutting crust off cinnamon toast for a picky eater super easy.

-Warmer days ahead. My feet thank you God.

-Sunshine to fill our school room. It just puts me in a good mood! And helps keep the boys awake!

-Blessings from a sweet friend.....one to hold and the other to drink!
 |
| Sweet little Crew |
 |
| Thanks again Meagan! |
Wednesday, January 18, 2012
Valentine's Day made simple
It is less than one month away. I was not even thinking about it until my crafty son ask me when we were going to decorate and make crafts.
We don't go crazy with the decorations, but I do put a few things up for fun. On Valentine's Day we usually have a party because we always have a party to celebrate a special day.
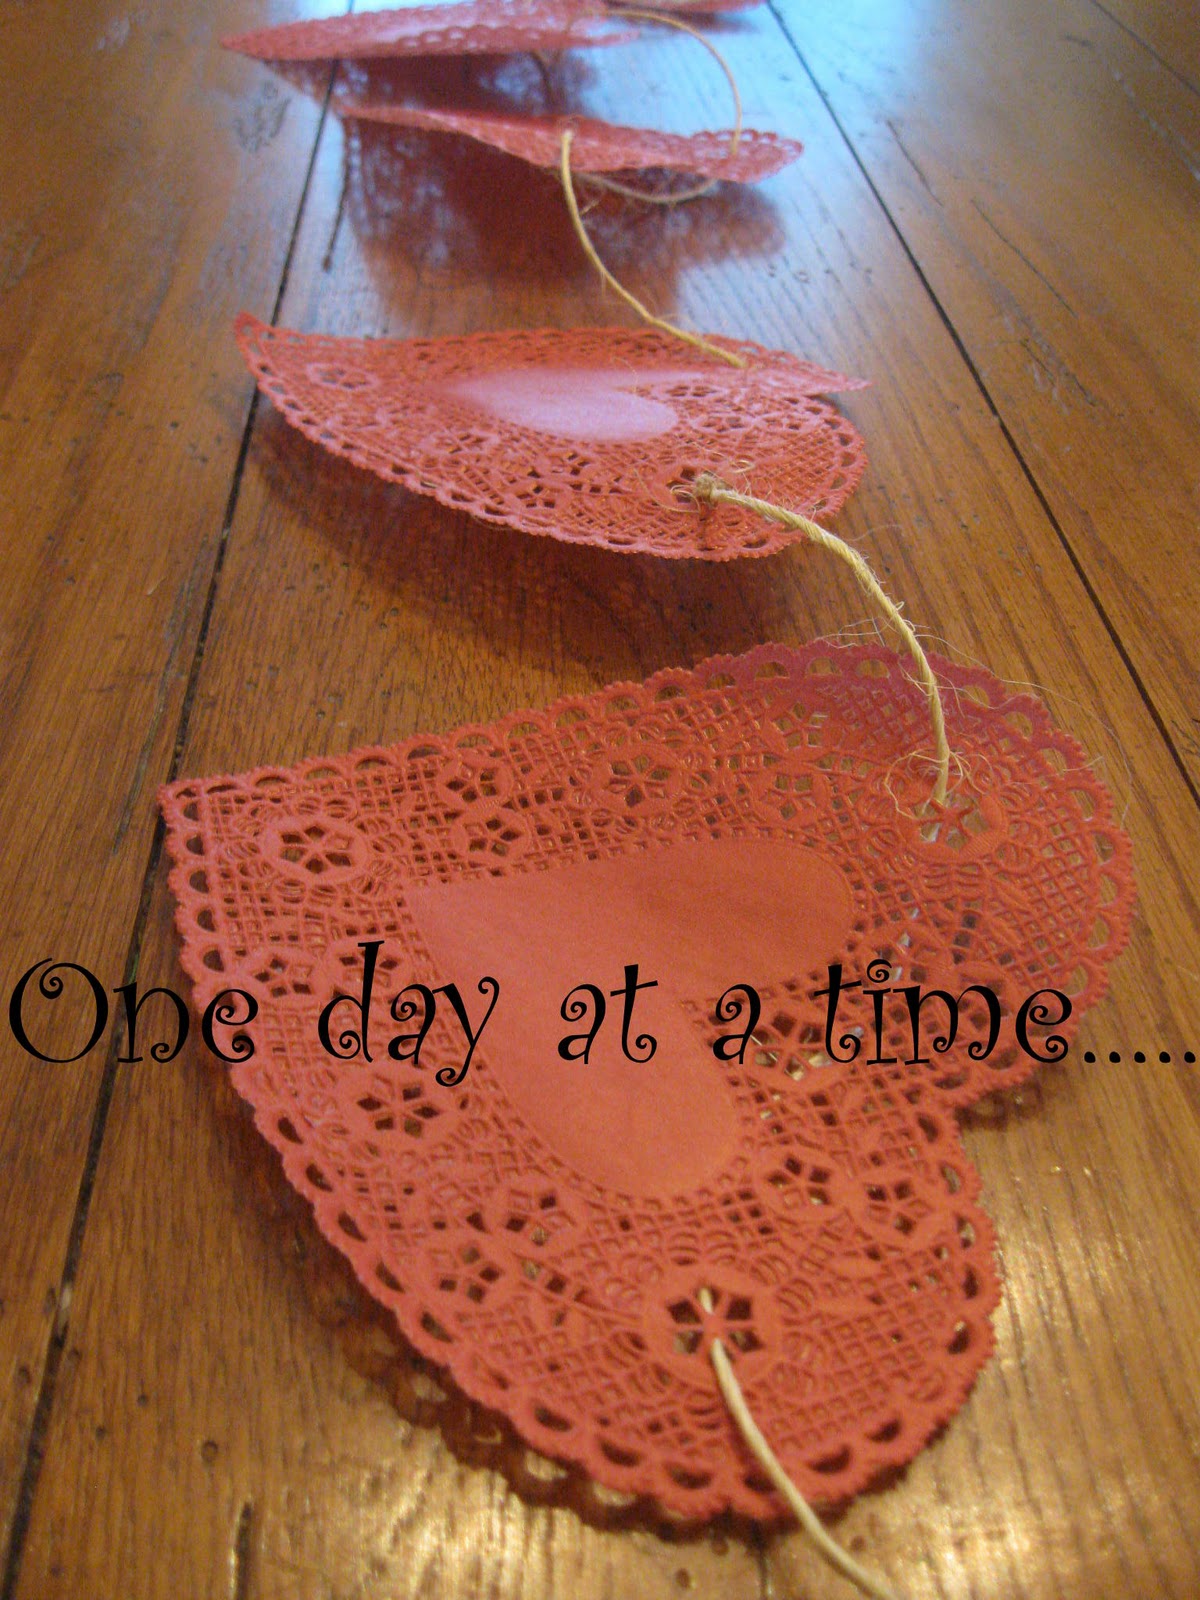
Right now I don't have a ton of "new" ideas for Valentine's Day, but did want to share a SUPER EASY heart banner.
WARNING: this is SO easy you just may laugh out loud!!! Simple and sweet though!
This is ALL you need:
-sisal/twine(or any kind of ribbon, etc. you prefer)
-heart doilies
 Determine how long you want your banner to be. Then cut the twine to size. Start threading the twine through the doilies like so.
 Not cutting anything except the twine!!! This is SO simple your children can do it!
 Ribbon would be pretty, but I love the simple, old look of the twine and the red(faded red to me)heart doilies. And I love the way it looks on my rustic china cabinet.
 It is just enough Valentine's Day decoration for our dining room/school room! At least for now.
Here are last year's Valentine's Day posts:
The Love Tree
Easy Valentine's Day Crafts
We don't go crazy with the decorations, but I do put a few things up for fun. On Valentine's Day we usually have a party because we always have a party to celebrate a special day.
Right now I don't have a ton of "new" ideas for Valentine's Day, but did want to share a SUPER EASY heart banner.
WARNING: this is SO easy you just may laugh out loud!!! Simple and sweet though!
This is ALL you need:
-sisal/twine(or any kind of ribbon, etc. you prefer)
-heart doilies


Here are last year's Valentine's Day posts:
The Love Tree
Easy Valentine's Day Crafts
Tuesday, January 17, 2012
Homemade Chocolate Pudding
This is the pudding the boys use to eat.
 |
| You know...."that" pudding |
And this is what they eat now.
 |
| Homemade goodness! |
Here is another simple, homemade recipe I wanted to share. I quit buying "that" pudding a while back. The boys will ask me from time to time to buy pudding, meaning "that" pudding. I just couldn't do it. It tastes funny and is loaded with sodium. And other things I am not sure of. YUCK!
So I finally decided it was high time those little boys had pudding. This was so easy. It does have to set up so you have to make time for that, but the making of it was simple.
There is that word for 2012 again!!!!
Anyway I hope you get a chance to try it out soon!
Chocolate Pudding
Yield: 6-8 servings
Ingredients:
¾ cup sugar
1/3 cup cornstarch
¼ tsp. salt
4 cups milk
1 tsp. vanilla extract
3 oz. unsweetened chocolate, finely chopped
Ingredients:
¾ cup sugar
1/3 cup cornstarch
¼ tsp. salt
4 cups milk
1 tsp. vanilla extract
3 oz. unsweetened chocolate, finely chopped
Directions:
In a medium bowl, stir together the sugar, cornstarch and salt. Set aside. Combine the milk and vanilla in a medium saucepan. Heat over medium-high heat until small bubbles form around the edges. Add the chopped chocolate to the saucepan and stir with a spatula until the chocolate is melted, about 1-2 minutes. (The chocolate may appear slightly speckled and not completely melted. Don’t worry, it will smooth out later.)
In a medium bowl, stir together the sugar, cornstarch and salt. Set aside. Combine the milk and vanilla in a medium saucepan. Heat over medium-high heat until small bubbles form around the edges. Add the chopped chocolate to the saucepan and stir with a spatula until the chocolate is melted, about 1-2 minutes. (The chocolate may appear slightly speckled and not completely melted. Don’t worry, it will smooth out later.)
Ladle about a quarter of the warm milk mixture into the bowl with the sugar mixture; whisk until smooth. Whisk in the remaining milk mixture. Return the entire mixture to the saucepan over medium heat. Continue to cook, stirring with a spatula, until the mixture bubbles and thickens. Be sure to scrape the bottom and sides of the pan so the mixture does not burn. Continue to cook until the mixture is very thick, about 2 minutes. (To test, run a finger through the mixture on the back of a spatula – it should leave a distinct trail.)
Divide the pudding between 6-8 serving dishes. Cover with plastic wrap directly on the surface of the pudding to prevent a skin from forming. Let cool 30 minutes, then transfer to the refrigerator to chill and set completely, at least 2 hours.
Remove plastic wrap, top with mini chocolate chips,whipped cream or anything that sounds yummy on top of pudding! Serve.
Remove plastic wrap, top with mini chocolate chips,whipped cream or anything that sounds yummy on top of pudding! Serve.

Saturday, January 14, 2012
A hike, a bike ride and the park
Yesterday we had intended on taking a much needed hike. We love getting out away from everything and observing nature. We really enjoy those times.
Well yesterday we headed to a place that was in the heart of the city. That should have been our first hint not to go. But we are open for anything outdoors.
It was not the kinda hike we were looking for. In the heart of the city meant you could see highways all around you. And of course you could hear the traffic from the highways all around you.
Now don't get me wrong I think it is wonderful that this area was bought by the city. Their website says...
To promote the conservation and restoration of Tandy Hills Natural Area (THNA) as a rare remaining example of native prairie that was indigenous to most of the Fort Worth area.
To facilitate use of THNA as an education and recreation resource for experiencing and understanding the natural environment of predevelopment Fort Worth.
To increase awareness of the importance of protecting and preserving natural areas through the annual Fort Worth Prairie Fest and other activities.
So I am not totally bashing Tandy Hills Natural Area. I am sure it is a great learning tool for many children. And at certain times is a beautiful place. With 160 acres there to roam I know nature blooms and is breath taking....if you love nature of all kinds.
In fact it might be nice to go back in the spring. It was not so nice yesterday. Not for a winter hike.
And it was nothing like this winter hike!
So we quickly left. Seriously we were there for maybe 20 minutes. The boys were bummed!!! Almost in tears. We needed to be out of the house. We needed some sunshine!
So we drove home, aired up the tires on the bikes and off we went! Ahhhh, the cool air hitting our faces, the sun kisses our noses, oh and the pull of muscles that have not been used for some time.
But as me and Matthew(we are always in the back)rode we both decided it felt good! A good feeling of pulling those muscles!
We were headed to the park. There are many parks throughout our neighborhood along the trails. We stopped at two.
Our final destination.....the big park. We stayed for about 30 minutes. It was just what these little boys needed. They ran and chased each other. They laughed and giggled. They were CrAzY SiLLy! They were having a good time!!!

 There is something about being outdoors that rejuvenates your soul. Lifts your spirits. It made all the troubles of this past week seems like a long time ago.
We are in store for mild weather the next two weeks. I think that means more time outdoors.
Maybe more hikes, bike rides and park days!!!!!
Happy Saturday!
Well yesterday we headed to a place that was in the heart of the city. That should have been our first hint not to go. But we are open for anything outdoors.
It was not the kinda hike we were looking for. In the heart of the city meant you could see highways all around you. And of course you could hear the traffic from the highways all around you.
Now don't get me wrong I think it is wonderful that this area was bought by the city. Their website says...
To promote the conservation and restoration of Tandy Hills Natural Area (THNA) as a rare remaining example of native prairie that was indigenous to most of the Fort Worth area.
To facilitate use of THNA as an education and recreation resource for experiencing and understanding the natural environment of predevelopment Fort Worth.
To increase awareness of the importance of protecting and preserving natural areas through the annual Fort Worth Prairie Fest and other activities.
So I am not totally bashing Tandy Hills Natural Area. I am sure it is a great learning tool for many children. And at certain times is a beautiful place. With 160 acres there to roam I know nature blooms and is breath taking....if you love nature of all kinds.
In fact it might be nice to go back in the spring. It was not so nice yesterday. Not for a winter hike.
And it was nothing like this winter hike!
So we quickly left. Seriously we were there for maybe 20 minutes. The boys were bummed!!! Almost in tears. We needed to be out of the house. We needed some sunshine!
So we drove home, aired up the tires on the bikes and off we went! Ahhhh, the cool air hitting our faces, the sun kisses our noses, oh and the pull of muscles that have not been used for some time.
But as me and Matthew(we are always in the back)rode we both decided it felt good! A good feeling of pulling those muscles!
We were headed to the park. There are many parks throughout our neighborhood along the trails. We stopped at two.
Our final destination.....the big park. We stayed for about 30 minutes. It was just what these little boys needed. They ran and chased each other. They laughed and giggled. They were CrAzY SiLLy! They were having a good time!!!


We are in store for mild weather the next two weeks. I think that means more time outdoors.
Maybe more hikes, bike rides and park days!!!!!
Happy Saturday!
Friday, January 13, 2012
Time for a hike!
We will complete our second week back in school today!!! It seems like it has been our second month.
After the long break from the holidays it was a little hard to get back into the routine. BUT we did it!!
The days have been CrAzY and the weather has been cold. There have been a few days here in there for the boys to get outside, but for the most part we have been stuck inside.
Not today! It is time for a hike!!! A much needed time outdoors. Not just in our backyard either.
So after school today we plan to make this a FUN Friday!!!
The weather is suppose to warm up to the 50s and it will be SUNNY! Perfect weather for a hike!
What do you have planned for your Friday? Get outside and have some FUN!!!!
After the long break from the holidays it was a little hard to get back into the routine. BUT we did it!!
The days have been CrAzY and the weather has been cold. There have been a few days here in there for the boys to get outside, but for the most part we have been stuck inside.
Not today! It is time for a hike!!! A much needed time outdoors. Not just in our backyard either.
So after school today we plan to make this a FUN Friday!!!
The weather is suppose to warm up to the 50s and it will be SUNNY! Perfect weather for a hike!
 |
| Fall 2011 |
Thursday, January 12, 2012
Art class
I will admit it, I do not like allowing the boys to paint for fun. I really don't! It is messy and the smells(highly sensitive nose)sometimes make me sick.
It creates a big headache if it is not nice outside either. I have to put down a plastic tablecloth, get water, paper towels, make sure they have on old clothes, etc. You know what I am talking about.
BUT from time to time I do allow it. I simply take a Valium and deal with it. Just kidding, but I am sure that would help tremendously!!!
I just do some yoga and get in the right frame of mind. OK seriously sometimes I am a fun mom.
Latelythey Matthew has been bugging me to paint during "recess". I always come up with some reason to say no, but yesterday afternoon they found something Aunt Lissa had given them for Christmas.
Crayola Hassle FREE Watercolors!!!!
Oh WOW do I love these things!!!! They are perfect for those Messy Marvins.

The Crayola Hassle Free Watercolors are like regular watercolor paints—without the mess! There are no cups of water to tip over and no paints to spill. The specially designed paint pots contain a bright, solid color that is only activated when you dip in the brush tip. You can even turn them upside-down—they won’t spill or drip!
And see that white emery board looking thing next to the paint brush/pens? That is a little sponge that you wet and as they paint they clean their "brush". It rinses out very well.
They loved being able to paint yesterday!!! I am thinking we may now have art class every Wednesday.

It creates a big headache if it is not nice outside either. I have to put down a plastic tablecloth, get water, paper towels, make sure they have on old clothes, etc. You know what I am talking about.
BUT from time to time I do allow it. I simply take a Valium and deal with it. Just kidding, but I am sure that would help tremendously!!!
I just do some yoga and get in the right frame of mind. OK seriously sometimes I am a fun mom.
Lately
Crayola Hassle FREE Watercolors!!!!
 |
| Photo by Crayola.com |

The Crayola Hassle Free Watercolors are like regular watercolor paints—without the mess! There are no cups of water to tip over and no paints to spill. The specially designed paint pots contain a bright, solid color that is only activated when you dip in the brush tip. You can even turn them upside-down—they won’t spill or drip!
 |
| Cleaning his "brush" |
And see that white emery board looking thing next to the paint brush/pens? That is a little sponge that you wet and as they paint they clean their "brush". It rinses out very well.
They loved being able to paint yesterday!!! I am thinking we may now have art class every Wednesday.

Full Disclosure: I have no affiliation with Crayola and they don’t even know I’m writing about them. Just giving my personal opinion about a product I love.
Wednesday, January 11, 2012
Warmth from a fire

It is a lot of work for some folks, but we don't mind the work. Especially since it warms our home. And lets face it, a real fire is cozy.
I get lost in a fire. Watching the flames dance around and burn, I poke and play with the wood, moving it around, making sure every little inch burns.
I sometimes get in trouble for constantly messing with it. I am learning to just sit and tend it. Not play.
It intrigues me to sit and stare at it as it burns. The warmth from a fire is so comforting. It warms my soul. And my bones.
Last night after the boys went to bed I pulled up the ottoman right near the fireplace and sat and stared.
First off my feet were freezing! I got them as close as I could to the fire...you know until they start to burn. Not really burning, but that feeling. I backed off a bit, but stayed close. Finally after a long day my feet were feeling some warmth from the fire.
I sat there wondering what it would be like to sit and watch the fire until the last flame went out. We had been neglecting the fire for a while since we would be going to bed soon, but it had a thick bed of coals and a couple of pieces of wood still burning. I sat there for about 15 minutes watching the fire burn. I could tell it was getting close to going out.
The room suddenly was darker. The flames were trying to stay lit, but it was time to let it go.
I watched the fire take it's last breath and then it was just very hot coals burning. Hot coals still giving me warmth, but it was time to shut my eyes.
I turned off the one lamp, told Arthur goodnight and ran for my bed. I didn't want to leave the warmth from the fire!!!!
Are you crazy about watching/feeling a fire like me? Do you think I am nuts?!
Brant has been working today getting our firewood up on the patio. We should have enough to get us through this winter. There are a couple cold days coming this week. But the weekend doesn't look cold enough for a fire. And today...well Brant was sweating chopping wood.
Until we hit colder temps I will be be longing for the warmth from a fire..................
Tuesday, January 10, 2012
Taco Seasoning
To follow my new year goal of living more simple I wanted to share another homemade recipe. This is a DIY taco seasoning. Making things homemade can be a lot of work for me, but I feel so much better after they are done. And this homemade taco seasoning is so easy so not much work on this one.
Taco night is a favorite in our home. Well I guess it is more like tacos and burritos. It is fun, easy, quick and healthy, depending on how you make them. And now it can be even healthier with homemade taco seasoning.
We started making our own taco seasoning about a year ago. You can throw this together in minutes using ingredients you probably already have on hand. The result hasthe same a better flavor as the stuff from the packet, but without all that nasty sodium. No need to buy the packets ever again!
We use this in all kinds of recipes with ground meat to achieve that Mexican food taste.

Taco Seasoning
1 tablespoon chili powder
1/4 teaspoon garlic powder
1/4 teaspoon onion powder
1/4 teaspoon crushed red pepper flakes
1/4 teaspoon dried oregano
1/2 teaspoon paprika
1 1/2 teaspoons ground cumin
1 teaspoon sea salt
1 teaspoon black pepper
Mix all together in a bowl. Store in an airtight container.
It just does not get any easier then that!!
I always double the recipe to make sure I have plenty on hand. When adding to meat I have no idea how much we use. I would assume about 2 tablespoons.
Now go make some tacos!
Taco night is a favorite in our home. Well I guess it is more like tacos and burritos. It is fun, easy, quick and healthy, depending on how you make them. And now it can be even healthier with homemade taco seasoning.
We started making our own taco seasoning about a year ago. You can throw this together in minutes using ingredients you probably already have on hand. The result has
We use this in all kinds of recipes with ground meat to achieve that Mexican food taste.

Taco Seasoning
1 tablespoon chili powder
1/4 teaspoon garlic powder
1/4 teaspoon onion powder
1/4 teaspoon crushed red pepper flakes
1/4 teaspoon dried oregano
1/2 teaspoon paprika
1 1/2 teaspoons ground cumin
1 teaspoon sea salt
1 teaspoon black pepper
Mix all together in a bowl. Store in an airtight container.
It just does not get any easier then that!!
I always double the recipe to make sure I have plenty on hand. When adding to meat I have no idea how much we use. I would assume about 2 tablespoons.
Now go make some tacos!
Monday, January 9, 2012
It's Tea Time-Part 2
If you missed my "It's Tea Time" post on Saturday you will have to go check it out!
So did you get to watch it last night?! Season 2 of Downton Abbey? Oh it was good! I will not give it away to those that are waiting to see it!!! All I will say is...........within the first 15 minutes I was beyond happy!!! And not even 30 minutes later crying mad!!! You still have those to love and of course someone to hate!!!! Watch it soon!!!
If you remember from Saturday's post I told you we were going to have a tea party prior to the show. We did indeed have a tea party! It ended up being earlier than I had expected, but the boys were getting hungry and it gave us time to get a few things done before it began.
It started at 8:00pm and was not over until 10:00pm. We allowed the boys to stay up and watch it because they love the show. They know all the characters and know the story.
So I promised I would share pictures from the tea party. It was so much fun for me planning it, preparing for it and then actually sitting down to enjoy a cup of tea. Having tea with my three guys was so delightful. I am thinking this is something we just might do more often.
I have raised the boys always doing a special "party" of some sort. Celebrating this occasion and that. They know all too well that I enjoy setting a table and making a big to do out of something that is usually quite plain. That is just how I am wired.
And this is the tea party.....
 We ended up having tea biscuits, chocolate bars, finger sandwiches with cream cheese and you can't have a tea party without pretzels.
 The tea biscuits were nothing more than a scone recipe minus any dried fruit and I added more sugar. Plus sugar on top. We loved them!!!
 Ryan likes hot tea as well as me and Brant. Matthew does not. So I added an ice cube to his. I prefer my tea with real cream and sugar. While preparing for the tea I did a "little" research on making and serving tea. In my research I found a piece on Downton Abbey where Cora is having tea at the Dowager Countess' home......old lady Grantham.
***A tea ceremony provided an intimate setting between the hostess and her guests, for it was the hostess who prepared and served the tea, catering to each guest and handing them their custom-prepared tea one cup at a time. In this time honored ritual, one of the most important questions the dowager would ask was: “Would you care for weak tea or strong tea?” Cora’s preference would guide the Countess in the next stage of tea preparation, for if she said “strong tea,” then the Dowager would pour the tea as she had prepared it into Cora’s cup. Had Cora said “weak tea”, the Countess would pour a smaller quantitiy of the brew into the china cup, then top it off with hot water.
The Dowager would then ask her guest how much milk and sugar to add. She would have poured boiling water over the tea leaves in a tea pot, and steeped the leaves for three minutes, all the while conversing with her guests. At this point the water was no longer boiling. Then the Countess would pour in the milk. (If she poured it in first, she would have found it difficult to judge the strength of the tea by its color.) Hudson, the butler in Upstairs, Downstairs, said about pouring milk into tea: “Those of us downstairs put the milk in first, while those upstairs put the milk in last.”***
I was upstairs at our tea party.
In the picture below they were SO ready for the party to begin. Matthew could not wait to get his pudgy little fingers on the chocolate bars!!
 This is Ryan trying to get every last drop.....of SUGAR! There was actually a picture of him licking the inside of the cup, but it came out blurry. He was not about to let that sugar get away!
 And Matthew...well he knows what he is doing. He usually was holding the saucer in one hand and drinking with the other. Brant was also at the tea party, but no good pictures of Daddy. Maybe at our next tea party.
 It was a lovely tea party. I am anxious to start looking for tea cups and saucers. And a tea set. I love the look of the matching tea set with all kinds of different cup and saucer sets.....like what we used.

So did you get to watch it last night?! Season 2 of Downton Abbey? Oh it was good! I will not give it away to those that are waiting to see it!!! All I will say is...........within the first 15 minutes I was beyond happy!!! And not even 30 minutes later crying mad!!! You still have those to love and of course someone to hate!!!! Watch it soon!!!
If you remember from Saturday's post I told you we were going to have a tea party prior to the show. We did indeed have a tea party! It ended up being earlier than I had expected, but the boys were getting hungry and it gave us time to get a few things done before it began.
It started at 8:00pm and was not over until 10:00pm. We allowed the boys to stay up and watch it because they love the show. They know all the characters and know the story.
So I promised I would share pictures from the tea party. It was so much fun for me planning it, preparing for it and then actually sitting down to enjoy a cup of tea. Having tea with my three guys was so delightful. I am thinking this is something we just might do more often.
I have raised the boys always doing a special "party" of some sort. Celebrating this occasion and that. They know all too well that I enjoy setting a table and making a big to do out of something that is usually quite plain. That is just how I am wired.
And this is the tea party.....


***A tea ceremony provided an intimate setting between the hostess and her guests, for it was the hostess who prepared and served the tea, catering to each guest and handing them their custom-prepared tea one cup at a time. In this time honored ritual, one of the most important questions the dowager would ask was: “Would you care for weak tea or strong tea?” Cora’s preference would guide the Countess in the next stage of tea preparation, for if she said “strong tea,” then the Dowager would pour the tea as she had prepared it into Cora’s cup. Had Cora said “weak tea”, the Countess would pour a smaller quantitiy of the brew into the china cup, then top it off with hot water.
The Dowager would then ask her guest how much milk and sugar to add. She would have poured boiling water over the tea leaves in a tea pot, and steeped the leaves for three minutes, all the while conversing with her guests. At this point the water was no longer boiling. Then the Countess would pour in the milk. (If she poured it in first, she would have found it difficult to judge the strength of the tea by its color.) Hudson, the butler in Upstairs, Downstairs, said about pouring milk into tea: “Those of us downstairs put the milk in first, while those upstairs put the milk in last.”***
I was upstairs at our tea party.
In the picture below they were SO ready for the party to begin. Matthew could not wait to get his pudgy little fingers on the chocolate bars!!


Maybe next Sunday another tea party before Downton Abbey again!
Subscribe to:
Posts (Atom)