Showing posts with label Tuesday Tips. Show all posts

Tuesday, October 8, 2013

Tuesday Tip-Homemade Scarecrow


You might remember my cute little fallscape with our homemade scarecrow and hay bale.  The boys were so excited to make a homemade scarecrow.  And of course curious to buy it at a feed store.....city boys!  I did adore the cuteness, but after the rain started he soon looked like this.


And then it rained again.  And again!  "Someone" forgot to tell me that this was not a good idea.  And I will admit I never even thought of the weather being a factor.  And we never drilled holes in the wheelbarrow so he sat in water.  For days.  When it would stop raining I would go out dump out the water and just as soon as I was done another downpour would come!  The hay bale was falling apart and ants were finding it to be a great place to make their home.  Throw in the awful SMELL of wet rotting hay and let's say it was just nasty!  So shortly after poor Mr. Scarecrow looked like this.


It was time for plan B. 

Carefully remove wet, smelly hay bale and throw in the back of your truck.   Oh wait---first recruit your husband and his truck.  Give him gloves because the hay bale is full of ants.  Stand back and watch his massive arms throw a wet hay bale in the back of his truck.  And listen closely as he says, "I knew it would not work".  Quietly listen and thank him for all his hard work.  And then say goodbye to Mr. Scarecrow. 

Next have Honey drill holes in the wheelbarrow because rain is coming AGAIN!  Set up new fallscape of simple mums, pumpkins and a cute flag and call it done.


Tuesday Tip:  When making a homemade scarecrow it might be best to plan to have him under a porch.  The weather is brutal on such a delicate guy.  And in my opinion hay bales are suited for much dryer climates. 

Tuesday, August 13, 2013

Tuesday Tip-Idiot Box Detox


With school just a few weeks away it is time to have an Idiot Box Detox.  I will shamefully admit that box has been watched way too much this summer. 

Until school starts the boys will have to make an agonizing decision each day about watching TV.  Morning or afternoon?  They are allowed one hour. 

Once school starts we do not turn the TV on until much later in the day.  Maybe not until the evening news.


When I announced my new plan yesterday I got lots of complaints.  I might have witnessed a meltdown.  I heard things like, "I'll be bored", "What do we do" and the old "You are mean". 

Looks like I could use some help from Momma Bear.


Yep, I am the bad guy right now.  But it will pass just like it did yesterday. 

This is what happens when you turn off the tube and make your children use their imaginations.


They create and learn.  They have plenty to share with Daddy when he gets home---explaining how magnets work and showing off masterpieces of art.

And when the indoor fun runs out you might find them like this.

No we did not have a cold front come in and yes Matthew is having trouble with the knot.
 
How do you handle TV time with your children?
 

Detoxification-the process, real or perceived, of removing toxins from the body.

Tuesday, July 30, 2013

Tuesday Tip-Homemade Italian Seasoning

I've had this recipe for a couple of years now and finally got around to making it/measuring and pouring into a bowl and mixing. 

I use a lot of Italian Seasoning.  I use it every Friday night making our homemade pizza dough.  And I sprinkle it on our pizzas before going in the oven.

I made this seasoning two weeks ago, but wanted to try it a couple of times before sharing.  My thinking was if Brant and the boys eat pizza as usual then the seasoning must taste the same.  This past Friday was week two using it in the dough and on top of pizza.  I finally asked and no one could tell a difference. 

SCORE!  It's a keeper!

I will say this could be expensive to make if you do not have all spices and dry herbs on hand.  In my case it cost me nothing thanks to my inlaws giving home grown-home dried herbs for a Christmas gift last year!

Here is what you will need:

3 tablespoons Basil
3 tablespoons Oregano
3 tablespoon parsley
1 tablespoon garlic powder
1 teaspoon onion powder
1 teaspoon thyme
1 teaspoon rosemary
1/4 teaspoon black pepper
1/4 teaspoon red pepper flakes

Mix all in bowl (or the container you plan to keep it in) and stir.  Once this sits on the shelf for a while all those seasoning settle to the bottom.  So make sure to give it a shake or two before using it each time.


It smells amazing!  And looks so fresh compared to the store bought. 


You might also like my recipe for Homemade Taco Seasoning .

Tuesday, July 23, 2013

Tuesday Tip-Make Your Own Flower Arrangements


I love making my own flower arrangements.  I try to remember in the spring to make sure I plant seeds or buy baby plants.  I really should be planning for next year right now.


Planting flowers in our yard that I can bring indoors is just another way I enjoy living a simple life.  The cost is next to nothing!  A seed packet is less than $2!  And I get flowers for months!  I love being able to walk out whenever I want and cut flowers to make an arrangement.  Or to have just a single flower.  This summer (and spring) I have had a single flower in a tiny vase in the bathroom every week.  It's a nice way to brighten up a little room.  By the way Marigolds make a great cut flower.  I try any and all flowers growing in our yard.  What's the point in growing them if you can't enjoy them indoors too. 

 
In this vase I have sunflowers, zinnias and spearmint.  By the way the vase is actually a plastic container (Sunsweet prunes).  I just knew it would come in handy for something. 


Vase inspirations is from Monica over at The Homespun Heart .  I simply glued the sheet music to the container and added a piece of burlap and tied. 


Homemade flower arrangements also make a perfect little sussie.  Now if I can figure out what flowers I could plant in our yard to last through fall.  Happy Tuesday to you.

**sussie- a small "just because" gift.**

Tuesday, June 11, 2013

Tuesday Tip-How to Cut a Mango

It's true what they say about your taste buds.  They do change after so many years.  I first tried mango on our honeymoon in Playa del Carmen in 1999.  I did not like it.  BUT a couple of years ago Matthew saw it in the grocery store and ask if he could try it.  I love when they boys want to try something new so I was excited to bring some home. 

I had no clue how to cut it.  When you do not know how to do anything the trusty Internet/Google is the way to go.  Or YouTube.

Many of you may very well know how to cut mango so you can just scroll down to the last picture of the newest mango lover.  Otherwise check out my pictures on how to cut a mango.

By the way when I did purchase a mango a couple of years ago I had a new found LOVE for mangoes.  So did Matthew!

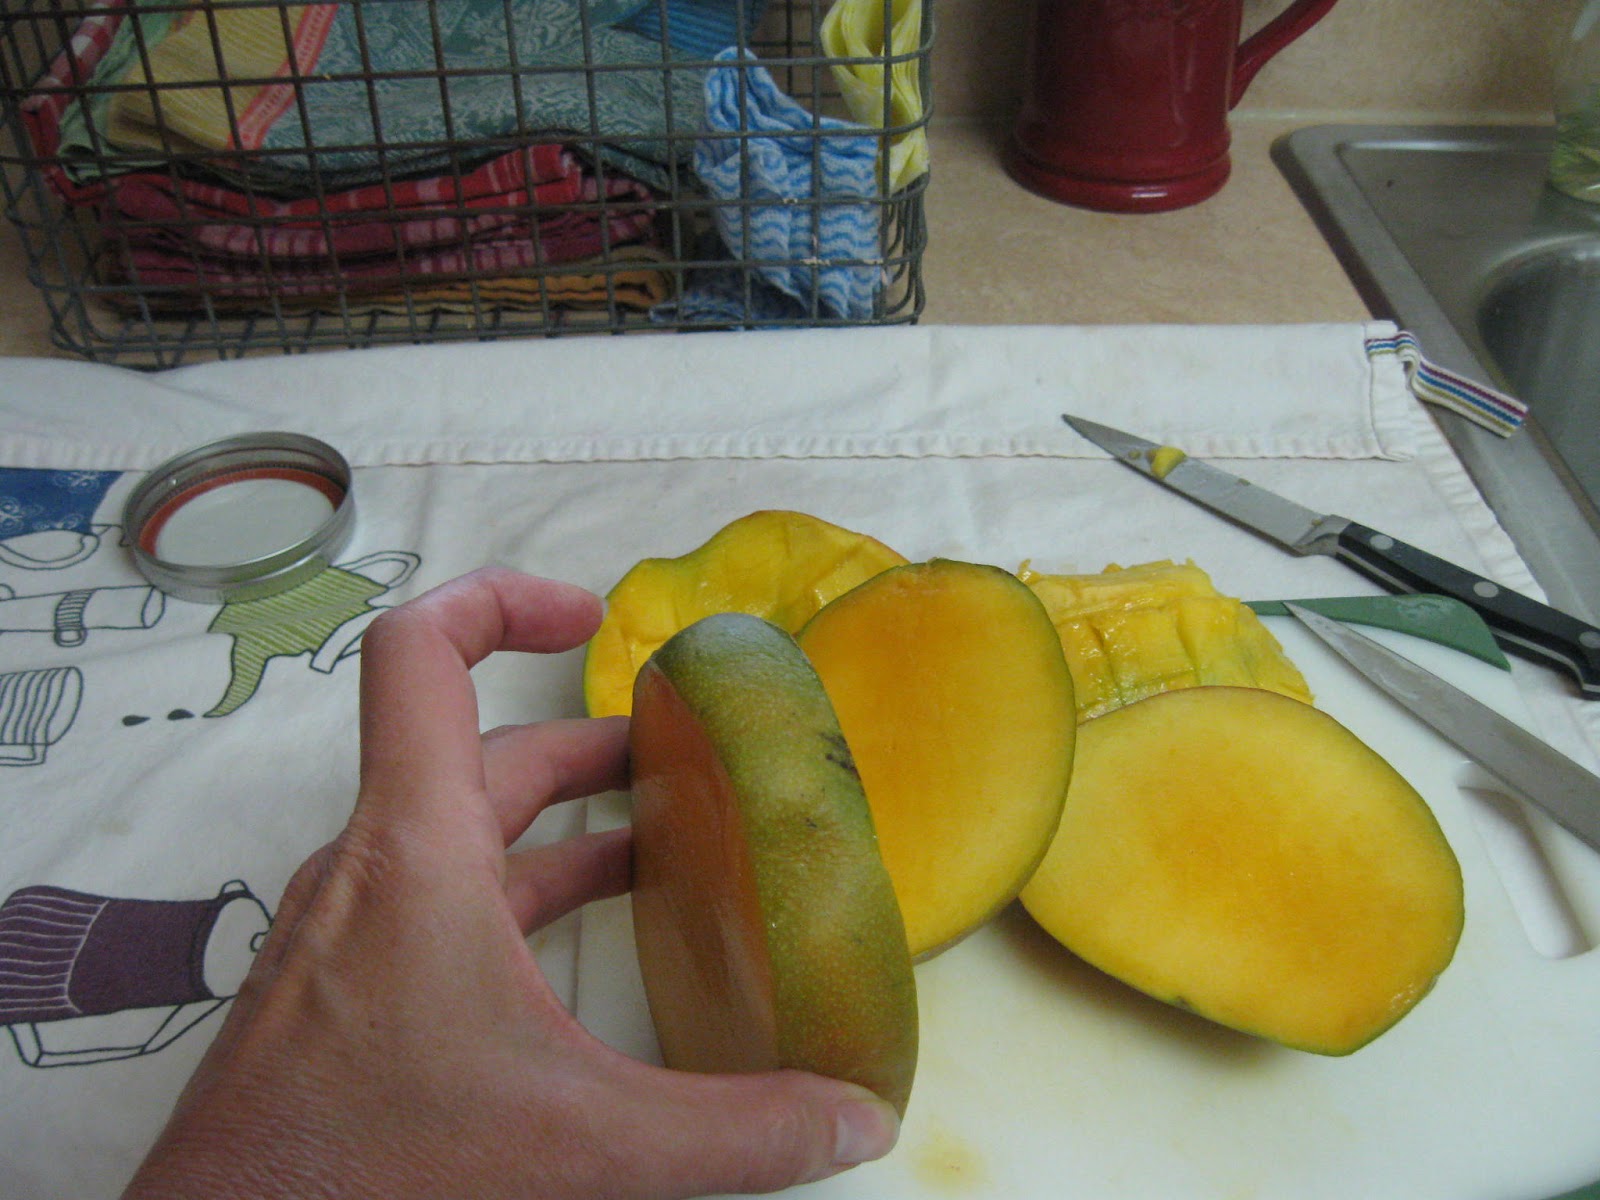
Stand the mango on a cutting board with the stem end down and hold. Place your knife about 1/4" from the widest center line and cut down through the mango. Flip the mango around and repeat this cut on the other side. You'll now have little ovals of mango flesh.  These are called the "cheeks." What's left in the middle is mostly the mango seed.
 
 Cut parallel slices into the mango flesh, being careful not to cut through the skin. Turn the mango cheek 1/4 rotation and cut another set of parallel slices to make a checkerboard pattern.
 
Here’s where you can choose your favorite method. Either “slice and scoop”—scoop the mango slices out of the mango skin using a large spoon—or “inside out”—turn the scored mango cheek inside out by pushing the skin up from underneath, and scrape the mango chunks off of the skin with a knife or spoon.  I prefer the "inside out" method.
 
And there you have it.  How to Cut a Mango.  They are so sweet right now (and on sale at my Kroger!)  And going super fast in this house now that three of us LOVE them. 
My newest mango lover.

Tuesday, May 7, 2013

Tuesday Tip-Try, Try Again

I was closer to 40!


Before children I cooked many nights and made sweet treats from time to time.  Once I had twins I gave up on cooking almost all together.  But in the past few years I have become much more daring in the kitchen.  I have learned to make lots of homemade meals, snacks, treats, etc. instead of buying processed.  I started baking and cooking like a MAD woman!  I decided to be brave in the kitchen.

I love to try new recipes.  Many times they are not what I thought they would be, but oh so close. Many times I get really bummed out that no one likes a new recipe, but me.  And that is when I have to remember to try, try again.


So here is one I will be trying again........the highly anticipated results of the Macaroni and Cheese Pizza.

Macaroni and Cheese Pizza-the homemade macaroni and cheese was to die for!! Seriously if you are still making mac-n-cheese from a box it is time to start making homemade. It is so easy and taste way better!!!  Butter and flour to make a roux, add milk and cook until nice and thick.  Add lots of extra sharp cheddar and drink it up.  No really then add the pasta.  Oh WOW! This was a goal of mine a couple of years ago to learn to make homemade macaroni and cheese.  Now don't get me wrong. The boys lived on Kraft mac-n-cheese when they were younger.  I can see them now in their highchairs eating a bowl of it.  Even the microwave kind!  I shudder!!!!!!  Sadly I ruined Ryan.  He prefers the stinking Annie's brand shells and cheese that I do buy every once in a while.  Annie's is "organic", but that still can not compare to homemade.  Box over my homemade?  Silly boy.  He has no idea what he is missing!  Fortunately his brother loves it and eats his share. 

If you are a user of the box mac-n-cheese I dare you to make homemade mac-n-cheese this week!
Here is our family's favorite....well almost our entire family. 
Pioneer Woman's Macaroni and Cheese -for the pizza I did not use this recipe exactly.  I made it as I said above....Butter and flour to make a roux, add milk and cook until nice and thick.  Add lots of extra sharp cheddar and drink it up.  No really then add the pasta.

Anyway back to the pizza. The macaroni and cheese pizza was not to die for.  It was eaten, but was not a total hit.  It was good, but could have been much better.  Due to timing of making the mac-n-cheese and the homemade pizza crust, when I added the mac-n-cheese a lot of the sauce had cooked down.  To avoid this next time (yes, there will be a next time) I am thinking of adding an Alfredo sauce to the pizza crust.  It was in major need of a sauce.  And a little more flavor.  Maybe bacon crumbles on top next time too.

So my Tuesday Tip for you is Try, Try Again .  When it comes to new recipes don't give up.  Make changes, jot them down and commit to making it again if you think you can make it better.  Oh sure it is easy to make the same old favorite recipes week after week, but where is the fun in that?! 

Try something new and have a good attitude about it.  The worse thing I can do is say it taste bad, funny or I don't like it.  The boys immediately have a preconceived view of that food, meal or recipe.  I try to keep my comments to myself (tell your husband to do the same!). 

Don't give up and Try, Try Again!!!!!


Tuesday, April 30, 2013

Tuesday Tip-Are You a "No-Reply" Commenter in Blogger

Ok, I am not an expert on blogging and usually do not discuss the boring logistics of blogging but today I wanted to share a little tip.
 
One of my favorite parts of having my blog is the opportunity it gives me to connect with all of you. I love reading your comments, answering your questions and getting to know you all a little better. One of the ways I do this is by replying to your comments through email. 
 
 
When a comment is made on any of my posts it is sent to my inbox. In order for me to be able to reply to your comment, there has to be an email address visible in your blogger profile. Otherwise, when I go to respond instead of showing your email in the "To" box it says "no-reply blogger." I realize I can always respond to comments and questions in the comment thread on posts and I do try to remember. But I simply think it's easier for the you, the reader, to have your questions answered via email. That way you don't have to keep checking the comment thread.


 To change your settings to allow reply comments, open up your blogger profile.  On the right hand side of the screen there is a little orange button that says "Edit Profile." You want to click that button.  In the "Edit User Profile" screen you simply want to check the box that says "show my email address."

Finally, scroll down to the bottom of the page and click the "Save Profile" button.

Like I mentioned connecting with you is the best part of blogging. I don't always have the time to reply to every comment via email but I do appreciate the time you take to say hello and I read every single one. I also realize this post is geared towards Blogger users and some of you use other platforms. If you have tips for a similar process for Typepad or Wordpress, please share them!

Tuesday, April 16, 2013

Tuesday Tip-Getting Your Feet Sandal Ready


Trees are budding, flowers are blooming and the sun is shining.  The days are getting warmer.  Now is the time to pamper your feet and prepare them for their “Coming Out Party!”

Maybe you have been looking at the perfect sandals. Or already picked up those cute flip flops. 


Well before you put your toes in a pair of sandals or flip flops you need to help those “winter weary feet” be ready to spring forward.

When I am not bare footed you can find flip flops or sandals on my feet.  In fact I have been wearing them for a month already.  I never even thought to check on the looks of my winter weary feet.  And let me just say I should have!

When your eight year old feels your heels and announces you have callouses and then proceeds to ask, "Is that embarrassing"? .....you know it is time to pamper your feet. 

It was actually quite funny and I did laugh.  And I also proceeded to bring out all my supplies to get my feet ready for this season.  It is much easier than you think. 


Pedicures are nice I will admit.  But I refuse to pay money for something I can do myself.  So over the years I have used and searched for the best products to work for me.  Hopefully these will help you too.

So let's get our feet ready. 

What you will need:
-pumice stone
-Dr. Scholl's pumice foot scrub
-Gold Bond Foot cream
-Lotion of your choice for every day
-old short socks

I first use the pumice stone and the foot scrub once a week.  Either in the shower or with a small amount of water in the tub.  Let feet soak to get nice and soft.  If you do this in the shower do it at the end of your shower after your feet or nice and soft.  Once feet are soft use a quarter size amount of the foot scrub on each heel.  Rub heels with scrub and pumice stone removing dead, rough, dry skin. 

Dry feet and rub on a generous amount of the Gold Bond foot cream on your heels. This next step can be done nightly or several times a week. Next put on your old socks that you have cut out the toes in.  I used a thin pair so my feet would not get too hot.  And cutting the toes out is much more comfortable to me.  It allows my toes to still breathe and wiggle.

Toes-Sinful Colors/Love Nails 282

 I try to apply lotion daily to my feet.  This is hard for me because I can't stand the feel of it.  So using the socks nightly is a must for me.  If you can handle lotion apply it daily.

Sandals and flip flops are notorious for making feet look like, well, "flip flop feet".....gross, stained, dry and crusty heels.  Like this.


Just start looking at feet as you stand in line at the grocery store.  I promise it will make you want to come home and take care of your feet.

The reason is sandals and flip-flops offer little support and cushioning.  They make the perfect environment for crack heels to thrive. That “slap slap” nature of the sandal or flip flops on your heel with a plastic sole is not a good idea.

I vowed last year not to wear flip flops this summer, but alas they are on my feet right now as I type. I vowed to spend a little more on good quality leather sandals, but there are too many cute less expensive flip flops! So I vowed this spring and summer to take good care of my feet. 

Now one more tip for you today.  On my pursuit to pamper my feet I have come across a homemade foot scrub.   

To get rid of the callouses on your feet you can create a simple salt scrub.  Take 1/2 cup of Epsom salts and add peppermint essential oil.  Put the mixture in an airtight container.  Soak your feet in a tub of warm water and then rub the mixture on the soles of your feet.  Using a pumice stone scrub the callouses.

After your soak, dry your feet.  Now treat your feet to an invigorating lotion.  Mix 5 drops of peppermint essential oil and 2 ounces of unscented lotion together.  Rub a small amount on the soles and tops of your feet.  This will soften the callouses and refresh your feet

And wear the socks to bed again!  Hope this all helps in getting your feet ready for sandals and flip flops.

Peppermint essential oil-Check!
All I need is the Epsom salt.

Happy Tuesday!